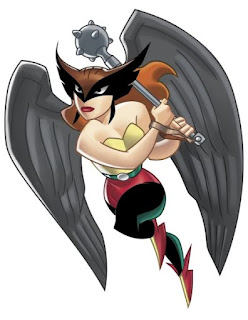
We're almost done with our series on the making of Steampunk Hawkgirl. If you're just tuning in now, we’ve talked about how the leggings, corset, wing harness, mace, the Worbla bits, and the supersized feathers came together, but let’s keep digging into the piece that makes this whole costume so challenging: the wings themselves.
After doing some initial research when I was in the thrall of a post-convention rush way back when, I decided that an extending arm configuration would be the best way to go for this particular costume (I definitely recommend reading about said investigations to see why I came to that conclusion and if the same setup will also work for your project). Initial tests with a cardboard mockup of the wings proved successful, so it then became a matter of how to translate the mockup into sturdier materials.
For all the details on how that initial translation was completed, check out this guest post by my cousin, Mel. She and her friend James were able to take the dimensions from my mockup and turn them into aluminum 'bones', which ended up being the rough draft/foundation for the finished wings.
While that rough draft was being completed, I was teaching myself to use the metal-shaping attachments on my model 4000 Dremel. Related aside: you will only need a handful of attachments for the Dremel and maybe a power drill for this portion of the project. Yes, really. Once I had the rough ‘bones’ in hand, I found that some additional cutting and sanding would be needed to get the overall shape and motion that I wanted. To do this, I used these cutting wheels for the Dremel and made several passes through the aluminum to get a nice, clean cut. If you're using these same methods to make your 'bones' it's definitely a good idea to get at least a five-pack of the wheels, as they will absorb heat and warp during your cuts.
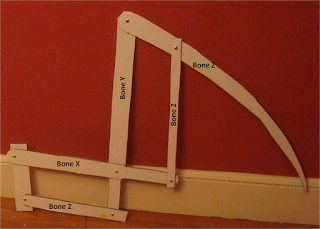
Each wing consists of five ‘bones’: a larger pair that are perpendicular to one another and carry most of the stress (X and Y in the diagram below), a smaller pair that parallel and support the first pair (1 and 2 in the diagram below), and the gently curving ‘bone’ that ties all the others together and gives the wing its shape (Z in the diagram below). [bone dimensions] This diagram will give you the of each bone relative to the others.

Ok, so that’s how to make the bones, but how do they fit together?
In order to have the wings articulate, the bones need to be able to pivot or hinge relative to one another. Mel and James did an enormous amount of research about the best way to make this a reality. When the rough draft of the bones arrived, Mel and James had already drilled holes in the bones at certain points, which I needed to adjust these slightly by using a 1/8" (0.32 cm) bit in my power drill. Once those were all set, I inserted small rods of nickel, brass, and aluminum through the holes and secured them in place with these brass collars. To make these rods, I purchased one of each of these from various local hardware stores (you can also order similar items from Amazon). Because the bones are ½” (1.27 cm) thick, and the collars are 1/8” (0.32 cm) thick, the rods needed to be long enough to pass through two of each. (2*0.5)+(2*0.125)=1.125" (2.86 cm). Again using the cutting wheels for the Dremel, I sliced up each of the rods into pieces 1.125” in length. The articulation points are highlighted in gold in the diagram above.
There’s not a huge difference between using aluminum, brass, or nickel for the connection rods since the rods themselves are fairly small and don’t do much in terms of adding weight to your rig. It’s really a matter of what you prefer to work with and what’s available to you. The brass seemed to hold up best in this configuration, but your experiences may vary.
The same rod-and-collar technique is what holds the wings onto the ‘backpack’ that allows them to be worn. Using the drill attachments for the Dremel, I punched 1/8” inch holes at the top and bottom of each of the swinging plates that themselves are hinged to the backplate. I then threaded 1.375” (3.49 cm) rods through each of the holes: (2*0.5")+(2*0.125")+0.25” for the width of the wood. A brass collar on each end applied as snuggly as possible allows the wings to extend while remaining attached to the hinged plates. The snugness part can’t be overstated; you want as little wiggle room as possible at any of the articulation points not only for safety’s sake, but to minimize the amount of stress that you’re putting on those joints.
In terms of getting the wings to open and close, that involved pinpointing the best spot to put the drawstring. For an extending wing configuration, there are two points from whence you can draw: near the articulation point on the top horizontal bone or at an identical point on the bottom horizontal bone. I’m sure there are points on the vertical bones that you could draw from, but the way I planned on adding feathers to the bones would not have allowed for that. The idea of the drawstring is to pull the wings to an open position, then allow gravity to work its magic when you want them to close. To discern the best draw point, I tied paracord to one potential location on one wing, then did the same at the other potential point on the second. After threading the cord through both sets of pulleys in the rig, I tested to see which setup allowed for easier use and generally felt more secure. The draw point on the lower of the two horizontal bones won hands down. This wasn’t too surprising, as this point provides a shallower angle of ascent, which, in turn, puts less pressure on the pulleys and rope. The same may or may not be true of your wings, so it’s a good idea to test all possible draw points if you can.
We’ll go more into how to keep the wings open while you’re walking around or posing in a follow-up post wherein I’ll tell you how I made the utility belt for this costume.
The bones seemed to be ready to go after this point, so it was then a matter of getting the giant feathers onto them. The post about the giant feathers details how lengths of aluminum screening are what attaches each feather to the other. The screening also acted like a humongous sleeve that I could slip over the top join point of the bones (where Bone Y and Bone Z meet). Once the sleeves were in place on their respective wings, I clasped them in place by threading floral wire back and forth through the screening at a couple key junctures. The aluminum portion of the sleeves was concealed beneath another sleeve made out of painted foam that was edged with Worbla.
Connecting the feathers to Bone Z (so they fan out) involved drilling three holes along the length of the bone with a 1/16" (0.16 cm) bit in my power drill, then connecting metal and foam with some high tensile strength fishing line. The holes and Bone Z itself were covered up by two of the foam feathers: one on each side of the metal.
This is by no means an easy or straightforward project, but it’s more achievable than it’s made out to be. A bit of planning, some experience with power tools, and a pinch of willingness to take risks will give you your own set of deployable wings! Best of luck on your costuming adventures!


