


We’re rapidly approaching the three months remaining mark in our countdown to Gen Con 2014, so, since we can’t obsess over the event catalog yet, it’s about time for a costume update. I mentioned a few posts ago that the cosplay lineup for Gen Con is pretty full, which I’m downright giddy about. There are three costumes that will (hopefully) be making their debut during the Best Four Days in Gaming and all three of them utilize the basics of what will be covered in this entry. What do all these outfits have in common? All three use some sort of form-fitting bodysuit as a foundation.
Single piece suits that fit snugly to the wearer’s body are extremely common in the iconography of various nerdy properties. You see them frequently in movies, in video games, all over anime, and just about everywhere in comics. While that ubiquity sometimes curries agitation, it’s not likely that the garment is going to disappear from our collective purview any time soon. So, when considering a cosplay of any number of characters, the question of how to go about making this particular piece of clothing springs to mind. Fear not though, for it’s actually a highly surmountable challenge.
Before we get down to the fabrics and the sewing, let’s go over the various members of the bodystocking family. You’ll often hear the terms bodysuit, bodystocking, catsuit, or unitard used interchangeably, but each of those terms actually refers to a specific garment. What’s the difference? The table below lists the distinguishing characteristics of each.
|
Bodystocking
|
Bodystockings cover the wearer’s torso and legs and may, but does not have to, conceal the arms. It differs from its siblings in that a bodystocking is usually made from sheer fabric and thus typically can’t be worn on its own.
|
|
Bodysuit
|
These look a lot like their cousins, leotards. The primary differential between the two is that bodysuits are essentially onesies for adults with snaps or hooks in the crotch to allow the wearer to pull the bodysuit over their head.
|
|
Catsuit
|
This is what usually comes to mind when people think of one-piece garments. Catsuits cover both the wearer’s torso and legs, but frequently encase the arms as well. What they tend not to cover are the wearer’s head, hands, or feet.
|
|
Unitard
|
A unitard functions almost identically to a catsuit in terms of what parts of the body are covered. However, a unitard will always have sleeves of some kind and will never feature a zipper (versus catsuits, which almost always need structural devices for closure).
|
|
Zentai
|
From the Japanese for ‘whole body’, this garment has characteristics of both catsuits and unitards, but goes a step further and, as the name suggests, encapsulates the entire body of the wearer (even the hands, feet, and face). Zentai occasionally go by other names including RootSuits, BodySocks, or MorphSuits.
|
This post focuses primarily on making a catsuit, but only a few modifications to the steps below are needed to make a bodysuit or a unitard instead. One of the biggest deterrents that sends would-be cosplayers skittering away from catsuits is having to work with stretchy, unforgiving fabric. While stretchy fabrics merit some special consideration and, potentially, some specific tools, they’re far from impossible to work with.
The first thing you’ll need to decide is which type of fabric you’ll need for your costume. All elastic cloth falls into one of two categories: 2-way stretch and 4-way stretch. As you can probably guess, these categories describe the axes along which the fabric will extend (e.g. 2-way will only stretch either on just the horizontal or just the vertical axis, while 4-way will stretch both ways). These two types of cloth are not direct substitutes; it’s rare that you can successfully use 2-way fabric on a project that calls for 4-way, but you can usually use 4-way in endeavors that recommend 2-way. The pattern you’re using for your specific project should explicitly list which type is needed for your garment.
Aside from stretchability, you’ll want to choose a fabric that has the right weight for what you intend it to do. Lightweight stretchy fabrics are great in that they add almost no bulk to your finished piece, but they are notoriously difficult to feed into a sewing machine. Heavier fabrics are more cooperative, but lend a definite solidity to your garment (which may or may not be what you’re going for). If you do select a lighter weight cloth, you can tack tracing paper or parchment paper to the edges with straight pins to keep it from sliding around your work space.

A little while back I mentioned that one of the three costumes that will be making its way to Gen Con is Mera of DC and Atlantis/Dimension Aqua fame. While I'm still plugging away at making a scalemail version of her gorgeous green scaly body covering, I want to have a solid backup plan in case that design doesn't turn out as planned, runs behind schedule, and/or I run out of scales. The other portions of the Mera costume, namely her crown and trident, will be covered in another post.
Thanks to the magic of the interwebs, there is a diverse selection of fun fabrics and versatile patterns available for your costuming needs. The base of my catsuit is this holographic spandex in kelly green and I used Kwik-Sew #3052 as my primary template. Not gonna lie to you guys, the pattern is borderline vintage and can be tough to track down. Kwik-Sew does have some excellent patterns for this purpose though (2722 and 2108 are excellent) and, since it's the same company, all the pieces of their patterns can be interchanged so you can make them modular if there's no one pattern that meets your needs. If you're keen on making your own catsuits, this site offers a variety of patterns that you may find useful or even better than the Kwik-Sew. This site is also an excellent resource and offers free patterns (these can be easily adapted for both male and female wearers).
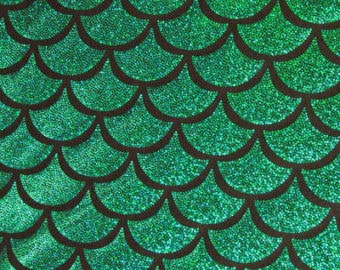 |
| My inner 12-year-old can't get enough of this fabric |
Ok, so we have fabric and a pattern. Other things you'll need for this costumey undertaking are: 2 tape measures, fabric scissors, pins, needles, a zipper that matches your fabric (if you're making a catsuit or a bodysuit), and matching thread. The vast majority of stretchy fabrics are made of synthetic materials, so it's a good idea to pair up like sources and use synthetic/polyester thread. I like to add excel to this list, since there's a bit of math on the immediate horizon and, as someone who does math for a living, I find it immensely helpful to have a reliable way to keep track of all my calculations. Hey, I never said there'd be no math. Also, if you use excel for the next step you won't have to re-do any of the attending arithmetic unless the proportions of your body change significantly.
Where are you going? Was it the threat of math? Ok, what if there was a tool that would do all that for you? Fortunately, Tim over at Stretchy.org has fashioned this java-based, unit agnostic interface that will spit out customized ratios, circumferences and other necessary data points for you. Most modern patterns will also provide guidance as to what measurements you need to take and how to scale them so your fabric will stretch to the desired shape at the end. The single best part about working with stretchy fabric is how forgiving it is. If your calculations aren't perfect or you can't get a full set of measurements it's ok. Obviously you don't want to omit whole measurements, but there's a considerable amount of wiggle room at your disposal.
Take your measurements, then, after doing the necessary conversions (or using Tim's site to help with that), alter your pattern as needed. Unfortunately, these conversions are dependent on the type of fabric and specific pattern you're using, so I can't offer specific guidance on the exact steps you need to take. If you're using the very same pattern and fabric that I've specified above, I started by taking all the measurements Tim recommended, then scaling them to be 85% of what they actually are. That 85% figure came about by laying my t-square on the floor, then taking a foot (30.48cm) of my scaly fabric and stretching it to various lengths. I found that I liked the way the fabric looked when stretched to 13.75 inches (34.93cm) in length, which is just about 15% longer than my starting length. 15% stretch translated into the pattern needing to be 85% of its original size. Special note: many newer patterns will do this for you; make sure you read all the instructions that come with your pattern before proceeding to the next step.
Once your pattern is set, tack it to the unpatterned side of your fabric with your straight pins and cut the fabric to match. Before assembling the cloth panels, check the manual of your sewing machine, as many manufacturers have recommendations for what settings to use on stretchy fabrics. You'll almost certainly want to use a zigzag stitch (which makes the seams even more forgiving) and spiked or textured feeder 'dogs' (the little feet that feed cloth into the needle of your sewing machine).
 |
| What I've got so far (please excuse the cat hair) |
Be patient with yourself and remember that you don't have to be perfect with this project. If you'd rather not deal with any of this sewing business and just get a catsuit, there are plenty of places to purchase one. Milanoo.com is an excellent resource for good quality catsuits, unitards, and zentai for very reasonable prices. The site also offers custom tailoring for a nominal fee on some of their suits. One thing to keep in mind with Milanoo though is your desired timeframe, as it sometimes takes more than a month for them to process and ship your order. If you wanted to go a little higher end, there are several Etsy sellers that specialize in custom suits. AliciaZenobia is a particularly reliable and all-around excellent seamstress who takes individual commissions.
Oh yay! The event catalog should be out any minute now. Time to indulge in another type of excel mayhem!
Post Con Breakdown: This was, by far and away, the most comfortable costume I've ever done. The suit stayed in place all day, the crown did an excellent job of taming my otherwise unruly hair and the trident was a big hit. I will definitely wear this again!

Post Con Breakdown: This was, by far and away, the most comfortable costume I've ever done. The suit stayed in place all day, the crown did an excellent job of taming my otherwise unruly hair and the trident was a big hit. I will definitely wear this again!
Nice guide! One thing though, milanoo is a notorious scam site, I wouldn't suggest them to anyone. Even if you have had good luck with them and have managed to get something resembling what you ordered, they have terrible business practices. Lying to customers, stealing product pictures (every last one of them), when they actually make an item instead of buying and selling the cheapest aproximation they can find, they go looking for the cheapest sweatshop they can find, the list goes on. They are honestly the absolute last place you should ever recommend.
ReplyDelete