


It’s difficult to believe sometimes, but we’re already closing in on 100 days to the doors opening at GenCon 2014. Squee! We’ve talked about it a couple of times before, but, due in no small part to our absence from the Best Four Days in Gaming last year, this year’s schedule for our visit to Indy is shaping up to be jam-packed. The cosplay docket is correspondingly full. It’s just tiptoeing on the line at which I have to remind myself you don’t have to do all the things this year; there will probably be other cons. This is what happens when I go a year without Gen Con.
While the docket itself is pretty much set at this point (active construction began on some of the costumes back in December), there are a handful of items pertaining to specific costumes that require an executive decision in the not-so-distant future. The primary quandary at present is honestly something I’ve never encountered in my costuming experience to date: do I deviate from established canon? Dun, dun, dun… I know, that seems like far too much gravitas for something that most people probably won’t notice, but my audience isn’t exactly one to overlook such deviations. I’m not sure why the question is arising with this costume as opposed to any of the others I’ve done, though I suspect it’s partially driven by an innate desire to use specific crafting techniques.
Maybe some clarification would help. The costume in question is that of Mera, Queen of Atlantis and one-time member of the Red Lantern Corps. My favorite comic arc of all time is Blackest Night and I’ve wanted to cosplay as Mera pretty much the instant I finished with the series. DC then, of course, went on to engage in a distinct pattern of repeatedly shooting itself in the feet. Sigh. Back to Mera though: she has a complicated history. Despite not occupying the upper eschelons of the DC pantheon and having her identity be inextricably tied to that of her husband, Mera is a fairly robust character. Fierce, conflicted, loyal, powerful and, at the same time, somewhat limited when compared to her superhero peers.
Mera’s base costume, whether as her normal self or as a Red Lantern, is a form-fitting bodysuit that features a scaled pattern. While this would normally be a great opportunity to delve into the challenges of working with stretchy fabric, part of me wants to go a bit off book. How? Well, my current idea is to create a tunic dress from hundreds of tiny aluminum scales. While the costume may end up veering back towards the canonical, this seemed like a good opportunity to write about the basics of making scalemail.
 |
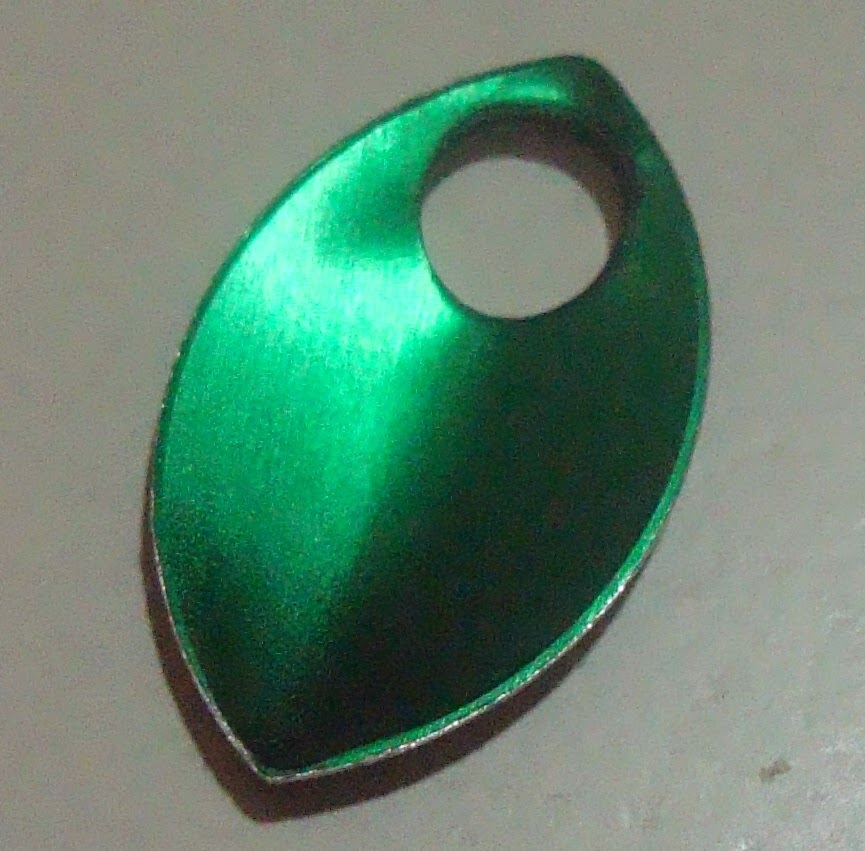
The vast majority of available crafting scales are made of aluminum, though plastic scales appear to be gaining in popularity. Both of these tend to be offered in a wide variety of colors, patterns, and shapes. Scales of other light-but-sturdy metals, such as titanium or niobium, basic alloys, or precious metals are also out there for purchase, but tend to be considerably more expensive than their common siblings.
Which scales to get depends entirely on the end goal of your project. Are you making a piece of jewelry? A dice bag? A functional garment? As you can imagine, each of those projects would require a different number of scales and the scales themselves would need to take on a specific workload. For example, while a dice bag made of solid gold scales sounds epic, it wouldn’t come cheap nor would the soft gold lend itself well to bearing the weight of many dice. I tend to skew towards using aluminum if I plan on using more than a hundred scales, if the finished piece has to be a particular non-metallic color, or if the project has to be able to bear weight.
Aside from determining which materials to use, you’ll need to consider which size you need your scales to be. Most vendors offer a small (around 9/16” or 14.3mm) and a large size (around 7/8” or 22.2mm). Smaller scales are great for finite details or creating non-linear shapes, but it takes a large amount of them to cover a given surface area. Larger scales have better coverage (thus letting you finish a piece faster), but tend to present gaps when you try to coax them into the shape of a curve. Again, the end goal of your project will help you determine which size or blend of sizes to use.
Ok, so we have our scales. How do we attach them to one another? This is where our earlier chat about chainmail comes in handy. There are two major schools of scalemailing: weaving with jump rings and weaving with split rings. The actual weaving technique utilized doesn’t vary regardless of which type of ring you use. So why does the type of ring matter? It comes down to what you’d like the end result of your project to be. Split rings (think like the rings on your keychain, but smaller) lend your scale ‘fabric’ a lot of stability, but they can be tricky to work with. There are specialized pliers that are designed to work exclusively with split rings and are definitely worth the investment if you intend to make many large scalemail pieces or items that need to bear significant weight.
Jump rings, also sometimes called butted rings, are the same kind that you’d use for chainmail, so you can use the same types of pliers. While jump rings are easier to work with, the fact that there will always be a gap in their structure (no matter how tightly you align the sides) can cause problems if your project has to bear substantial weight. That being said, there are a handful of workarounds to add stability to a large or heavy project that would allow you to still use jump rings. For example, if I do decide to weave a tunic dress for the Mera costume, I can feed metal or plastic boning through the jump rings themselves to give the dress some structure, thus taking some of the pressure off of the rings.
Jump rings, also sometimes called butted rings, are the same kind that you’d use for chainmail, so you can use the same types of pliers. While jump rings are easier to work with, the fact that there will always be a gap in their structure (no matter how tightly you align the sides) can cause problems if your project has to bear substantial weight. That being said, there are a handful of workarounds to add stability to a large or heavy project that would allow you to still use jump rings. For example, if I do decide to weave a tunic dress for the Mera costume, I can feed metal or plastic boning through the jump rings themselves to give the dress some structure, thus taking some of the pressure off of the rings.
Once you decide what type of rings to use, it’s a matter of choosing the right ring size for your project with the size of the scales you selected being the primary determinant. Most scale vendors will be able to recommend an appropriate ring size for your needs. If they don’t, parse through some pre-packaged scalemail kits that use scales of a similar size to those in your project to get an idea of what ring sizes work best.
Actually weaving with the scales is quite simple, arguably easier than chainmailing. The rest of this tutorial features a build with jump rings, but there’s really no procedural difference between using these and split rings.
 |
| This is the 'back' or concave side. |
Step 2: Open one ring, then thread it through the hole of the first scale so the ring drapes off to one side (doesn't matter which side). The open ends of the ring should point away from the hole in the scale with one half resting against the interior of the scale near the center line and the other half leaning outside the scale itself and onto your work surface.
Step 3: Take another scale and, with the convex 'front' facing you, (so the concave 'back' should be facing the concave 'back' of your first scale) thread the new scale onto the open ring using the portion of the ring that rests outside the scale and on your work surface. As you thread, the curvature of the ring will cause the scale to flip over, so both scales are now lying on your work surface with their concave sides facing up towards you. Close the ring with your pliers, then repeat steps 2 and 3 with the other side of the first scale. You should end up with a little triangle like this:
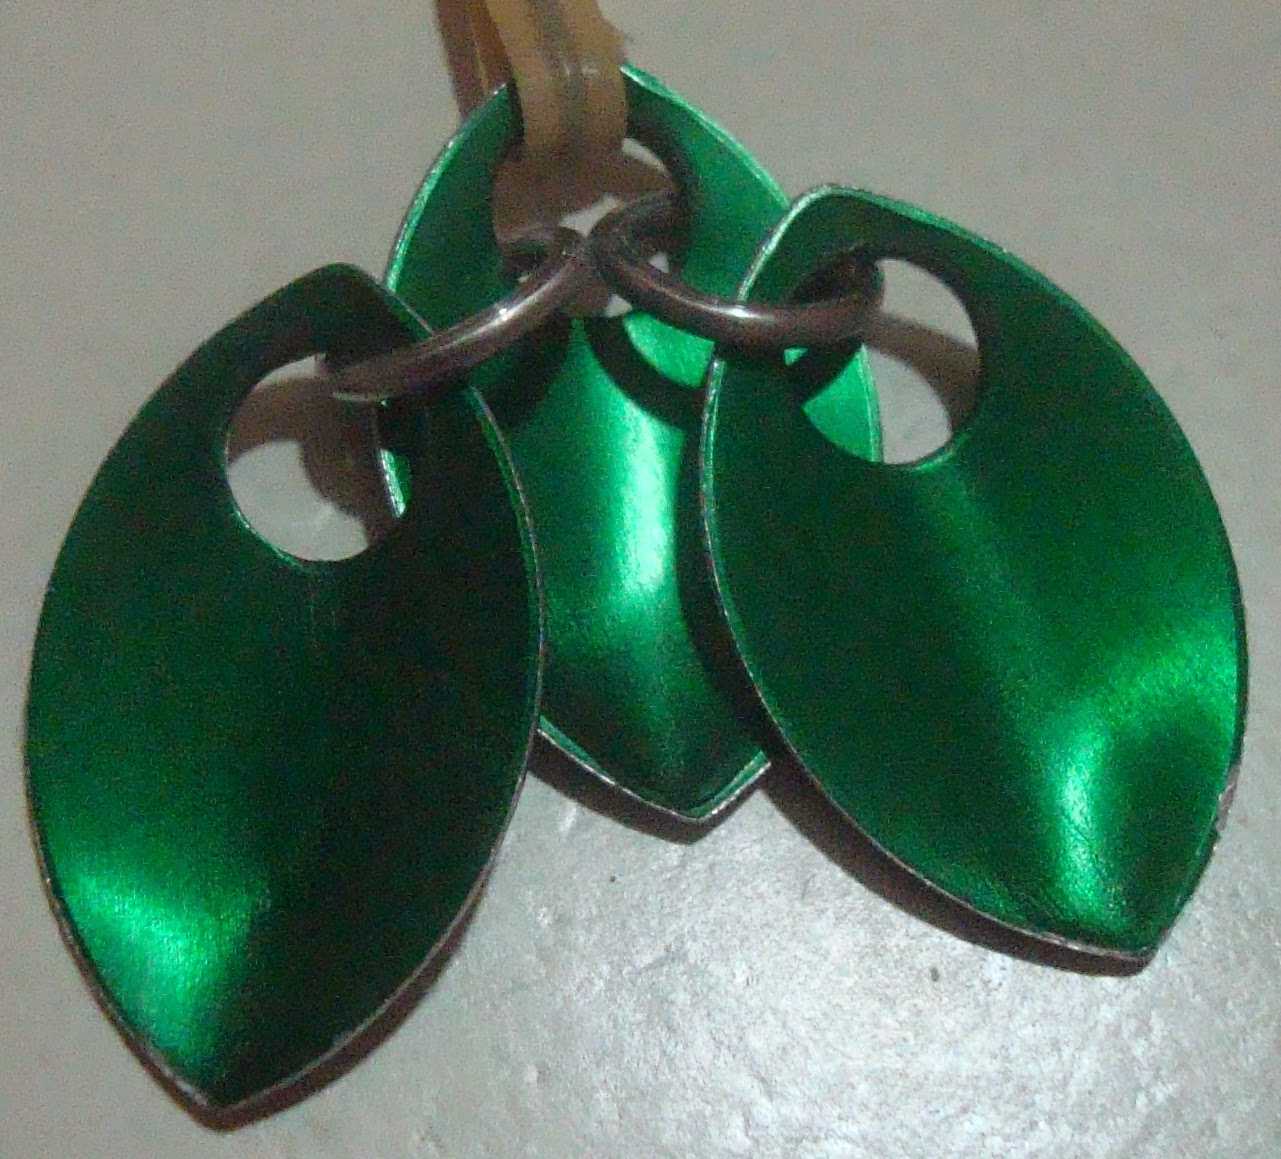
Step 3: Take another scale and, with the convex 'front' facing you, (so the concave 'back' should be facing the concave 'back' of your first scale) thread the new scale onto the open ring using the portion of the ring that rests outside the scale and on your work surface. As you thread, the curvature of the ring will cause the scale to flip over, so both scales are now lying on your work surface with their concave sides facing up towards you. Close the ring with your pliers, then repeat steps 2 and 3 with the other side of the first scale. You should end up with a little triangle like this:
Step 4: Repeat steps 2 and 3 once on each of the outsides of the two new scales. You should now have five scales joined by four rings.
Step 5: Go back to the row of two scales from steps 2 and 3. Open two more rings, then thread one open ring into each of the holes in these scales beginning from the inside edge of the hole (the side closest to the center line of the very first scale). Take another scale and, one at a time, feed the open ends of the rings closest to the center line of the scale from step 1 through the hole of this newest scale. Close each of the open rings. You now have six scales joined by six rings.
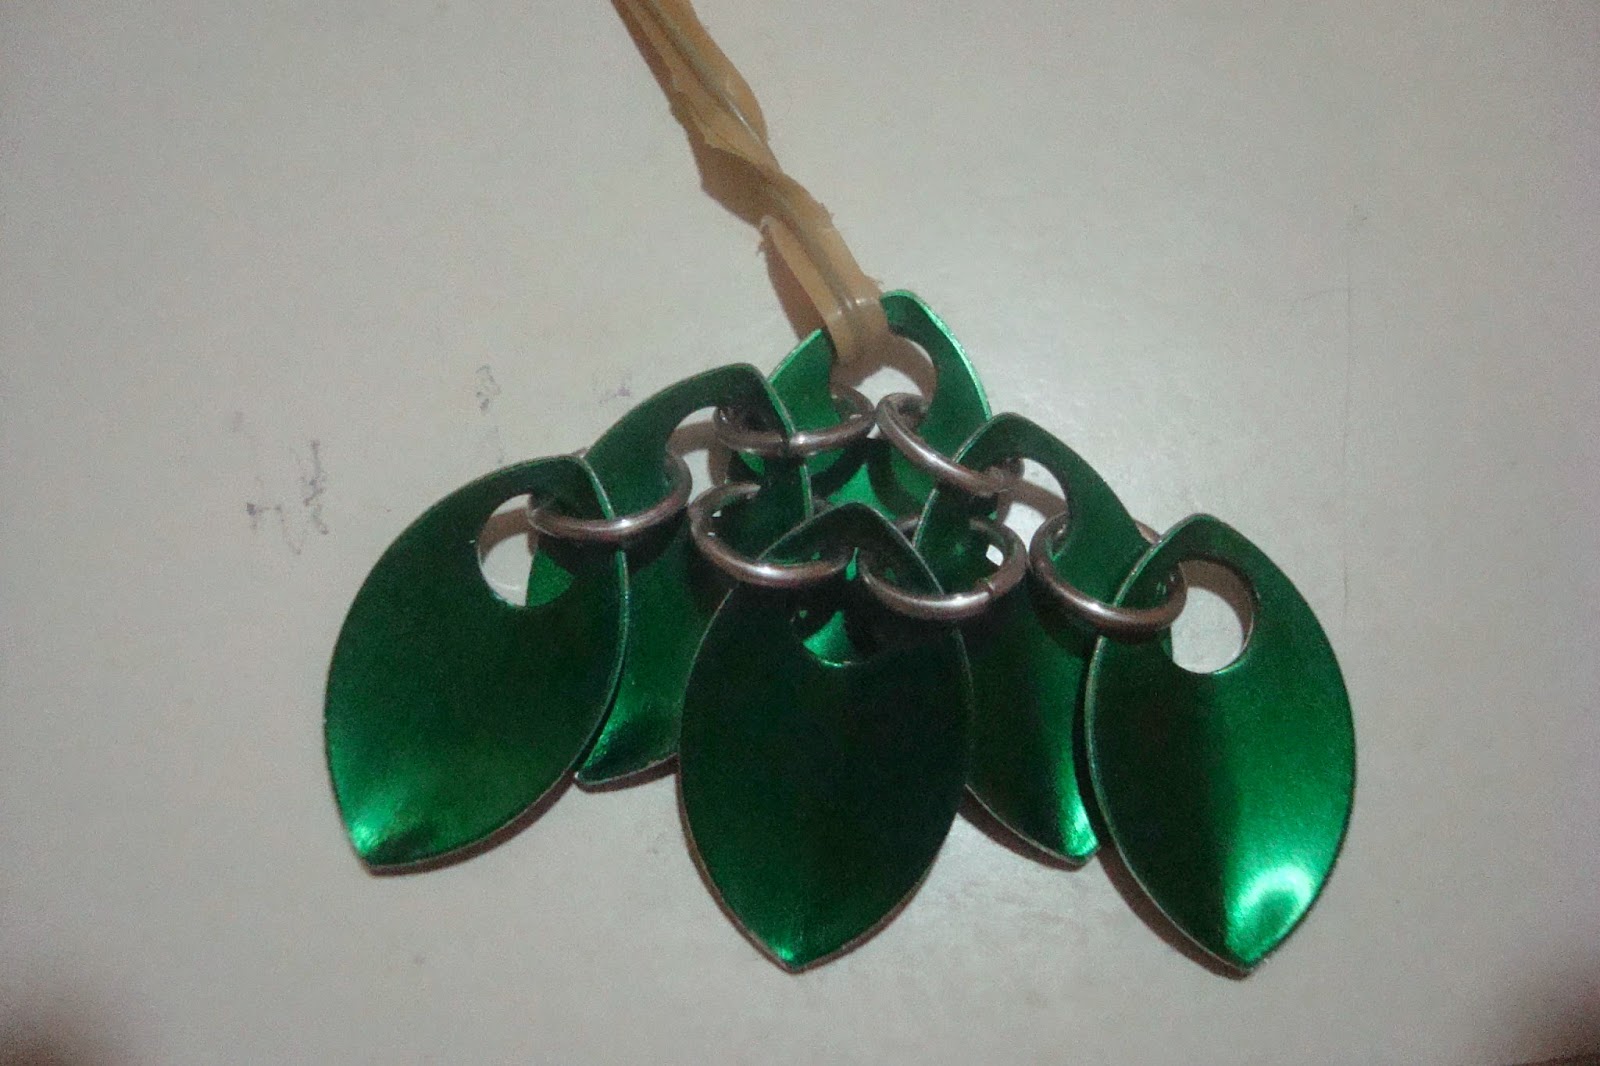 The 'fabric' will increase by one scale with each successive row. So, for our sample above, we have three rows: one with one scale, the next with two, the third with three. The next row would feature four scales: two on the outside edges that would need to be attached with steps 2 and 3, and two on the inside that would require step 5. You'd repeat this process until you got the scales to cover the surface area needed for your project.
 |
| Add scales to the open rings here and you've finished step 4. |
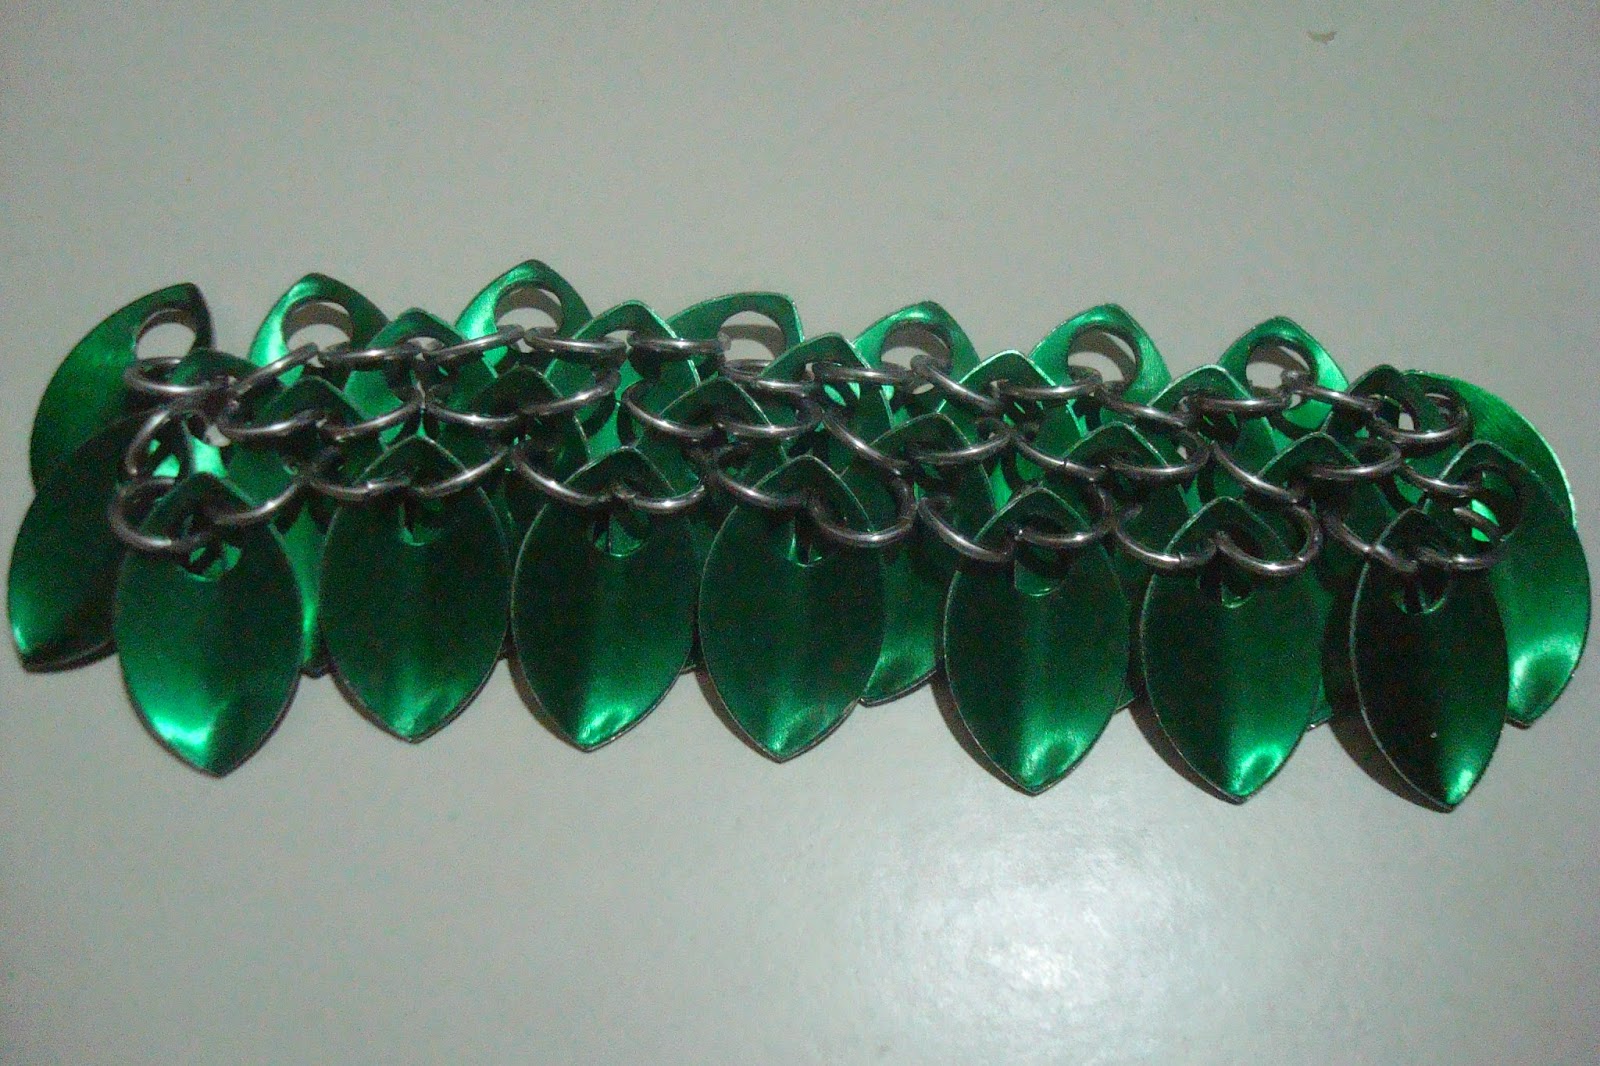
A good check to ensure your scales are secure is to count the rings going through them. Scales on the outside of your mail can have up to three rings passing through them while scales on the inside of your weave must have at least four support rings. Exception: unless you're building an expansion row to create a curved allowance in your mail. Conversely, an inside ring can have more than four support rings if you're building a contraction row to form a different type of curvature, but creating curves will have to be for the next scalemail post.
Update: Several messages have come in asking if it's possible to weave in a line rather than building a triangle. Definitely! Let's look at the quick example below:
To weave laterally or vertically, start with step one (though you can skip the bread tie this time), then only do steps 2 and 3 once. You should end up with half of the triangle from the step 3 picture above. Instead of finishing the triangle, weave a new scale to the side of your second scale, then tuck this new scale so it lies beneath the second scale. You should be left with three scales attached via two rings: two scales lying with their convex sides resting on your work surface and one scale with its convex side resting on the concave sides of the other two scales. If you're trying to work vertically, attach the third scale to the first scale directly above the second scale. You'll be left with the beginnings of a zigzag pattern that will eventually form a line as you continue weaving. The same structural checks (i.e. the number of rings going through each scale) apply regardless of the shape of your weave.
Best of luck with your scalemail experiments!
No comments :
Post a Comment