


At this point, PAX is so close that the proximity is inducing all sorts of anticipatory grinning. Man, it has just been far too long since my last convention…
Creating the Red costume has been fun all-around, but creating the Transistor sword was especially enjoyable. Thermoplastics + careful alterations = awesome futuristic sword, and you can’t really go wrong with that. My inner 12-year-old squees every time I see it. Hell, were it not for the low-ish ceilings in our house, I’d probably play with the sword at every given moment.
As the namesake of the game itself, it makes sense to put a little extra time and attention into the sword. While it’s not especially difficult to assemble, there are some potentially tricky components of the Transistor depending on the materials you decide to use. If you’re trying to closely replicate the source material, the blade of the Transistor needs to be at least translucent, though the trailer video depicts it as being mostly transparent.
| Image courtesy of Supergiant Games |
Speaking of shaping your plexiglass, let’s dive right in and talk about how you go about doing that. Rule #1 of working with thermoplastics is always be mindful of the temperatures being applied. Every single incarnation of thermoplastic is flammable and has a high likelihood of warping/cracking/otherwise losing structural integrity when the heat turns up. In the case of plexiglass, that magical temperature threshold is 170 degrees Fahrenheit (76.67 degrees C).
Pssh, that’s a pretty high threshold Kel. Why would you need to worry about that?
Because friction. You know, that thing you’ll encounter while shaping or drilling your plexiglass.
Oh, right.
170 degrees creeps up pretty quickly once you start applying a fine edge. If at all possible, stagger your work with the plexiglass to accommodate pauses. I took advantage of this unending winter and set my tools out in our unheated sunroom to cool every 30-60 minutes or so. A quick touch or smell test will give you an idea of when to take a break. If the surface you’re working with is warm or you’re starting to get acrid whiffs of petrochemicals, you may want to focus your efforts elsewhere for a little while.
Wait wait wait. Let’s back up here. You’re talking about tools, but what should I be using to shape the plexiglass?
That will honestly depend on the thickness of your thermoplastic. For sheets that are 1/8” (0.32 cm) or thinner, you can shape with an Exacto or other very sharp utility knife. Simply draw your desired cuts on your surface, then score with your knife. Once you get about a third of the way through the plastic, a little pressure will cause it to snap exactly along your desired line. The video below provides more helpful hints. After this, polish the edges as needed with steel wool or very fine grit sandpaper (700 or finer). For plastic thicker than 1/8”, you will need to use saw blades that are explicitly designed for use with acrylics. Same goes for any drill bits you may want to employ, regardless of the thickness of your plastic. Most hardware stores sell both the blades and drill bits; just look for ‘for use with plastics/acrylics’ on the packaging.
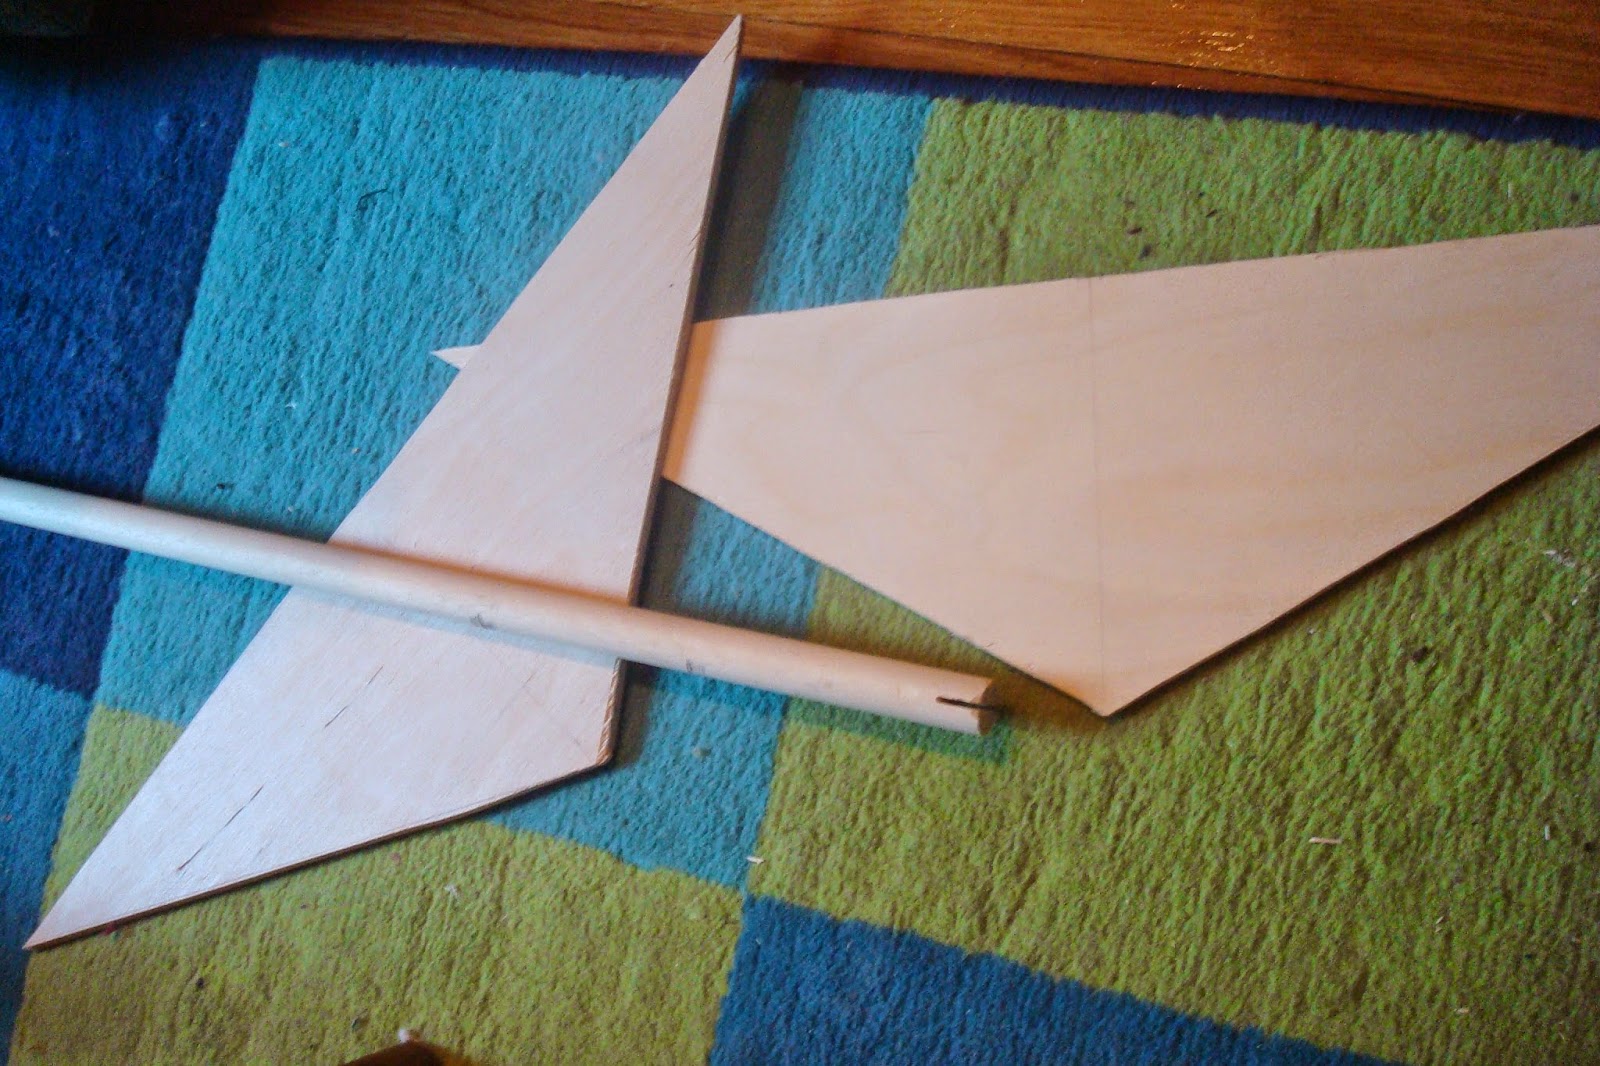
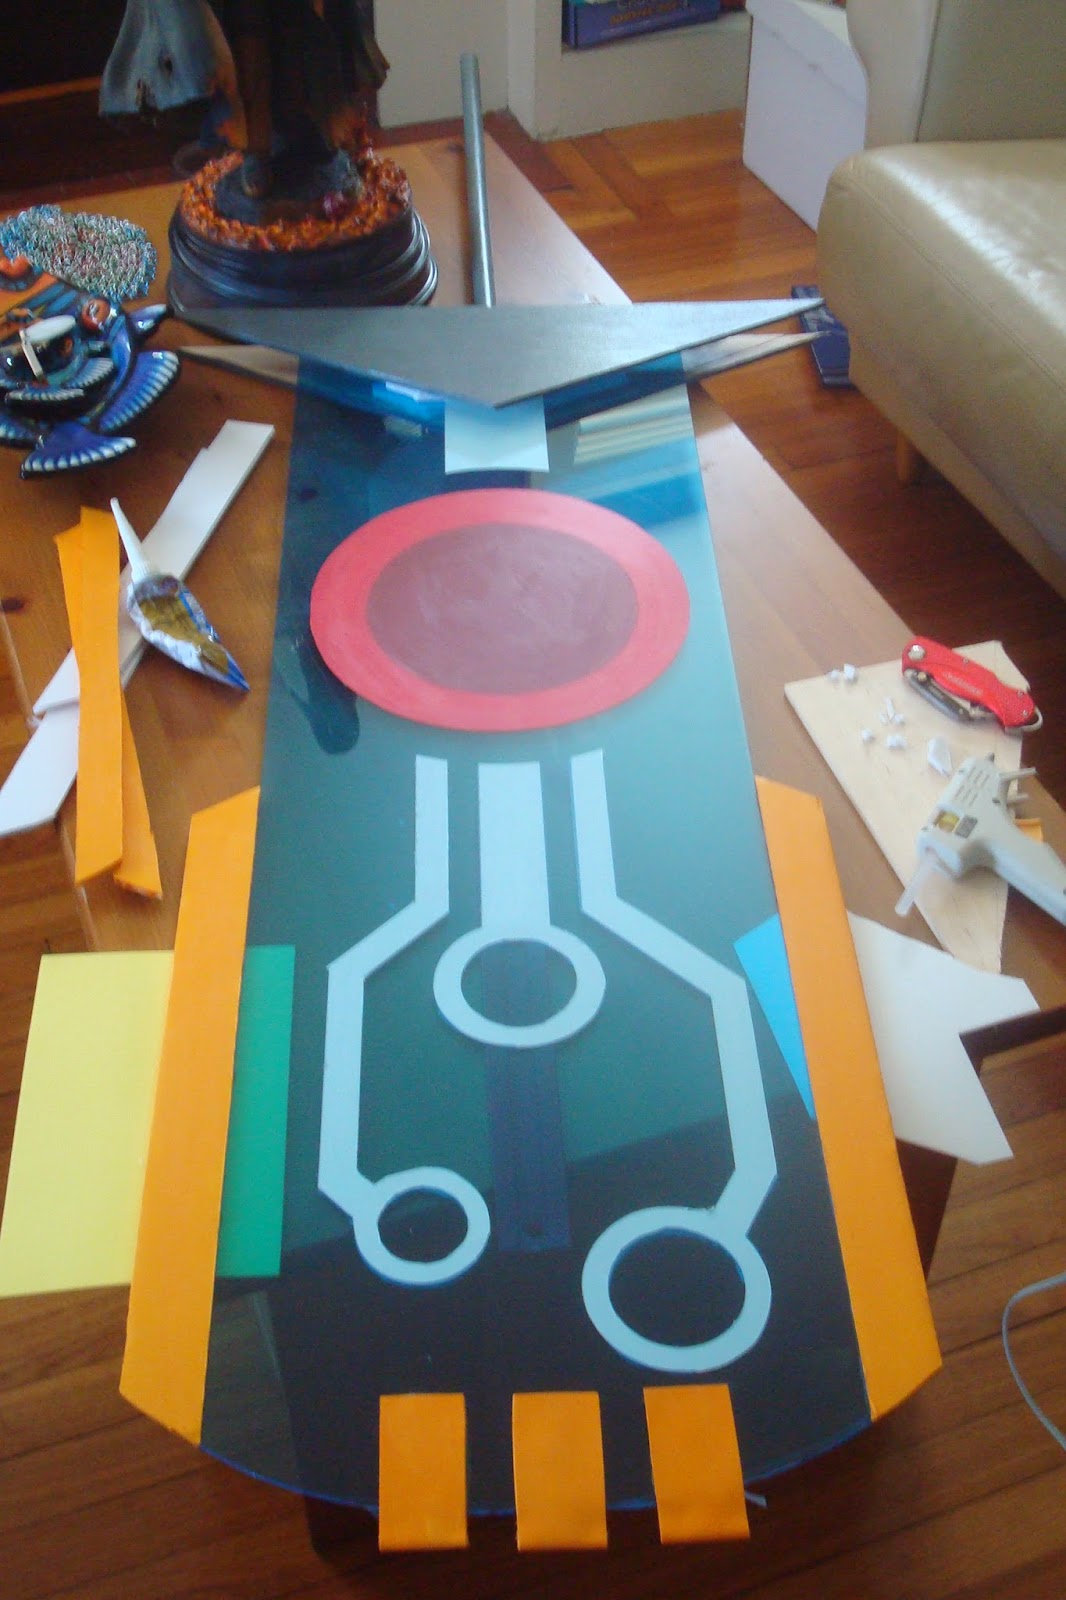
After you have your plexiglass in your desired shape, it’s a matter of creating the hilt and decorating the blade itself. I made the base and hilt from sheets/dowels of birch board, which I cut to emulate the triangular shape in the reference images, then added bits of foamstock for the circular details and actual grip. Birch is great in that it’s strong, lightweight, inexpensive, easily shaped, and readily takes paint. Any standard acrylic will serve for the purposes of this prop. I mixed a gray we had left over from a bout of mini-painting with a basic black, then added a deep gray fabric paint that had a lustrous finish to it to give the impression of metal. It took about 3-4 coats of the mixture to get even coverage on the birch pieces and 2 coats for the foamstock.
Special note about using birch wood: for this project I purchased pieces of birch from a craft store, not a hardware store. Why? The wood that's usually up for sale in a craft store has been pre-treated for crafting (specifically for taking paint), whereas wood from a hardware store is usually in a fairly raw state. If you end up buying raw birch, you may have to spend extra time sanding and treating the wood before it's ok to apply paint. Michael's, AC Moore and most big-box crafting stores do sell birch board (usually in very manageable sizes), so I'd recommend buying from one of those if you're planning on using wood for the hilt/handle.
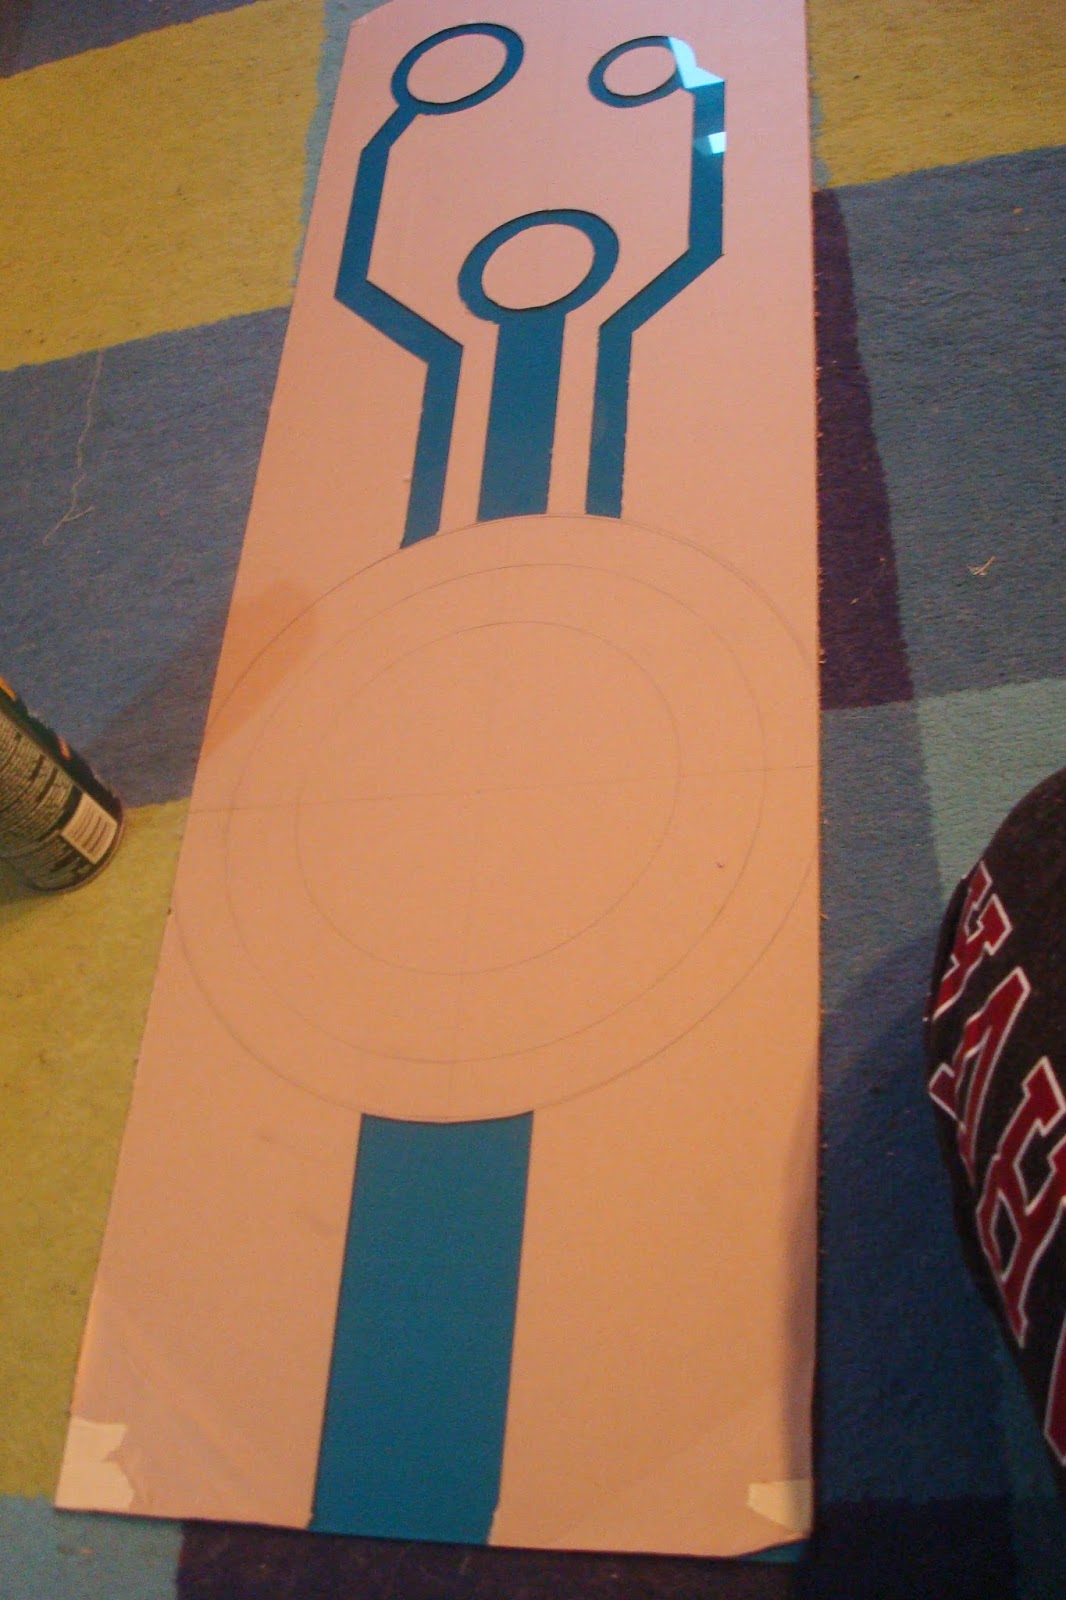
Drafting the design on the blade ended up taking the better part of about 6 hours, though if you’re less inclined to agonize over every curve and angle you could easily do so in about 2. Using the reference images, my T-square, and a random assortment of household objects that happened to have circular bottoms, I approximated the trademark forms in pencil. Another bonus to ordering plexiglass online is the fact that your plexi will arrive wrapped in protective papery covering. This will not only keep your acrylic pristine while you’re working with it, but can act as a custom stencil. Once I was satisfied with the look of the pattern, I carefully scored over the pencil with a very sharp utility knife, then peeled back the wrapping to reveal only the sections of the plexi that would be painted. You could just as easily use the stencil to etch into the plastic rather than paint, it’d just be a matter of personal preference. Acrylic paint tends to work well for this; just be sure to read the label to check that it will adhere to plastic. As plexi is inherently very smooth, you’ll likely need to apply 3-4 coats of paint to get even color coverage.
 |
| A distinctly feline brand of 'help' |
The Transistor itself pulsates with light when it converses with Red during the course of the game. If you're adhering to this portion of canon, then LEDs are your best bet. LEDs are perfect for this in that they are cheap, come in just about any size or shape you may want, can be battery powered, and, best of all, emit no tangible ambient heat. I bought a box of these, removed 6 blue ones from their respective plastic cases, then mounted the circuits into the hilt. If you're making a blade that's meant to be presented from only one side you can mount these directly onto the plastic. Operating the LEDs is as simple as flicking their switch.
I'm putting the last few touches on the sword and the rest of the costume with the intent that everything will be
Wow the sword looks great! Thanks for the write up :)
ReplyDeleteYou're very welcome! So glad you found it helpful!
ReplyDeleteWhat were the measurements of your piece of plexiglass?
ReplyDeleteThe plexi was 12" across, 38" tall, and 1/8" thick (30.48cm x 96.52cm x 0.32cm). You want the plexi to come to a height just below your belly button if you're going for canonic scale. If I were to make the sword all over again, I'd probably have the plexi be only 11" or 10" across to be a little closer to what's depicted in the game. Good luck with your cosplay!
ReplyDeleteThe sword looks AWESOME!!!! I can honestly say that this is a great work of art!!!
ReplyDeleteThat's very kind of you to say! Thank you!
ReplyDeleteDo you have any recommendations for altering this to fit in a 27" x 18" suitcase? Is there perhaps a way to cut/re-glue the plexiglass in the middle with very minimal damage? Looking to bring it to a convention across the country. Thanks!
ReplyDeleteHonestly, if it's at all possible I'd recommend shipping the sword ahead of you to arrive at your hotel/convention center the same day that you do. I regularly work with FedEx on the occasions where I've had to do this and it's not that expensive if you ship 2 or so weeks before the con.
ReplyDeleteIf shipping isn't an option at all, I'd alter the handle so it could be removed and make your cut in the plexiglass in the area that gets covered by the triangles of the hilt. You could then have the two sections be attached with the smallest hinges you can find (you can use gesso or a spray primer to be able to paint on the hinges if you want these to be blue). Two hinges, one on each of the far horizontal edges of the plexi, should be enough. This way, you can fold up the plexi to fit in your suitcase, but no one sees the cut. Also, this way the sword handle can act as a support for the plexi and keep it straight while you're walking around. Hope this helps!
Thank you so much for the response! I think I will just ship it ahead of time to be safe. Your work is wonderful and the guide has been a fantastic resource so far!
ReplyDeleteSo glad to hear that you found it helpful and that you've found a solution that will work for you! If you'd like, send us a picture of the final product on one of our social media pages. We'd love to see how everything turned out!
ReplyDeleteIam still trying to overcome the sheer awesomeness of this. I'm also curious as to how you attached the handle so it was strong enough? (in my currently attempt, useing wood iv not been able to get it to hold firmly, at least not for long.)
ReplyDeleteHi there. That's very kind of you to say, so thank you! As for attaching the handle, I took the birch dowel that served as the handle and cut a notch in the end so the plexiglass sat inside the wood. Picture the end of the handle as having a U shape and sliding the plexi into the U so the wood holds it on the front and back. After that, I drilled through the end of the dowel and the plexi, then put a matching screw through the hole to hold the plexi inside the U. You have to be very careful if you do this so you don't crack the plexi (see my note above about pilot holes), but it's very, very strong when it's all done. Please let me know if you have any more questions and good luck with your project!
ReplyDeleteMany thanks. I never thought to use translucent acrylic. Working in wood atm. I feel if I tried this in acrylic I would break it with in a day (cause I have no tools for acrylic). Its got me thinking a little more tho...
ReplyDeleteThis is so awesome! don't suppose you could link me to the colour/store you bought your plexiglass from? i cant tell which colour is closest from the interwebs..
ReplyDeleteSure thing. The exact plexi you see above in this tutorial is from TAP plastics in Transparent Light Blue(http://www.tapplastics.com/product/plastics/cut_to_size_plastic/acrylic_sheets_transparent_colors/519) You can also get a good approximation from ePlastics translucent blue http://www.eplastics.com/Plastic?search=2308 Good luck with your costume!
ReplyDeleteThis looks simple enough to do... (he sais now before everything fails XD) I'am just wondering one thing tho, Is this Transistor designed to be showen from only one side? If yes, I'd guess its fairly easy to just cement the 2 blades together instead of just using the one and having a wider handel ect..... Well looks like I know what I'm doing over the next couple of weeks.
ReplyDeleteNone of this was especially difficult, but it did take take a while to put together. This Transistor build is designed to allow the sword to be shown from both sides, not just one (I mounted all the LEDs into the handle so both sides would light up and both sides were painted). Good luck with your project!
ReplyDeleteYour circuits are in the hilt which makes it look like the light is coming from the triangle? I get it right, right? x)
ReplyDeleteYep, you got it. The LEDs are tucked inside the hollow created by the two pieces of wood that make up the hilt. They all point down towards the blade, making it look like the light is coming from the triangle. Let me know if you have any other questions!
DeleteI'm 6 foot, and I've calculated that the entire sword (hilt and all) should be 42 inches.
ReplyDeleteUsed a tape measure for waist to foot length, [in-combat] Red holds/drags the sword at approximately 40 degrees, Pythagorean Theorem wins.
42 inches for a 5 foot 5 inch person would be disproportionate.
Im making a cosplay sword right now and plan on using the exact plexi you got (Tap plastics light blue) im making the lionheart gunblade from FF8. im worried that if I use 1/8 thick plexi that it will be too wobbly and maybe break. How stiff is your blade? Im worried 1/4 would be really heavy.
ReplyDeleteIm making a cosplay sword right now and plan on using the exact plexi you got (Tap plastics light blue) im making the lionheart gunblade from FF8. im worried that if I use 1/8 thick plexi that it will be too wobbly and maybe break. How stiff is your blade? Im worried 1/4 would be really heavy.
ReplyDeleteHi Ryan. Your primary concern with 1/8 inch plexi will likely be its wobbliness rather than breakage. However, the handle on lionheart gunblade could easily be modified to give you the support you need. My blade was sturdy enough to hold its own through most use cases, but it would bend if I tried to hold it out horizontally for anything more than a brief period. If I could have added a bit more stability then it would have been absolutely fine, so 1/8 inch thickness will likely still work for you.
DeleteHey Mr. Care!
ReplyDeleteJust trying to go over using plexiglass for a sword of my own, and a bit scared it's going to be too wobbly/flimsy. Any suggestions for a bigger project on how to reinforce it to not let the wobble destroy it?
LOVE the blade, by the way!
-Anon
I noticed you mentioned it was a bit wobbly in a previous comment, if you could redo your whole project, would you have used a 1/4 inch thick acrylic instead of 1/8? I too am planning on making a weapon of transparent acrylic and I don't have the option of adding any kind of support(its just the handle and the whole blade is acrylic) to keep it from wobbling.
ReplyDeleteWhat is a drunk oktoberfest costume? A drunk oktoberfest costume is an immersive cluster of media platforms centered around a brand
ReplyDeleteVery nice post I really enjoyed it...You can also visit my website for
ReplyDeleteCollege escorts in Jaipur
Jaipur Escort Service
Russian Escorts in Jaipur
Call girl in Jaipur
Jaipur call girl
Jaipur escorts
Model Escorts in Jaipur
Air Hostess escorts in Jaipur
Housewife Escorts in Jaipur
College Call girls in Jaipur
Very nice post I really enjoyed it...You can also visit my website for
ReplyDeleteJaipur Escort Services
Jaipur Escort
Escort Services in Jaipur
Escorts in Jaipur
Jaipur Escorts
Jaipur Escort Service
Jaipur call girl
Jaipur Call girls
Escort service in Jaipur
Call girls in Jaipur
Very nice post I really enjoyed it...You can also visit my website for
ReplyDeleteCall Girls in Jaipur
Jaipur Call Girls
Escorts in Jaipur
Jaipur Escorts
Escort Service in Jaipur
Independent Escorts in Jaipur
Escort Services in Jaipur
College Call Girls in Jaipur
Very nice post I really enjoyed it...You can also visit my website for
ReplyDeleteEscort Service in Jaipur
Call Girl in Jaipur
Jaipur Call Girls
Jaipur Escorts
Escort Services in Jaipur
Escorts in Jaipur
Call Girls in Jaipur
Celebrity Escorts in Jaipur
Air Hostess Escorts in Jaipur