Showing posts with label crafty. Show all posts

Cosplay: It's All on My Belt

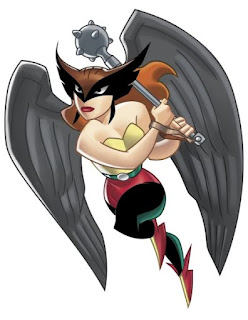
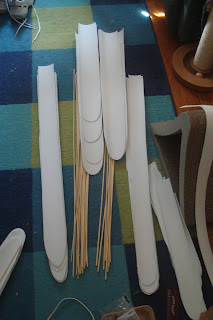
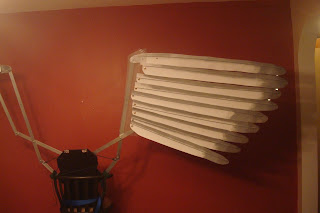
Looking back on all the previous costumes that have been featured on site, we've comparatively spilled quite a bit of digital ink on Steampunk Hawkgirl, so it's a little bittersweet that her series is coming to an end. If you're just joining us now, you can see how the corset, the leggings, the giant feathers, the mace, the Worbla components, the wing harness, and the wings themselves came together by following the links. This final installment covers a critical, if not-so-very-glamorous component of the outfit: the utility belt. 

Wait, how could a belt be so important? 

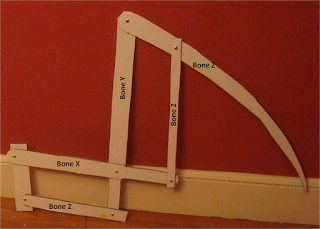
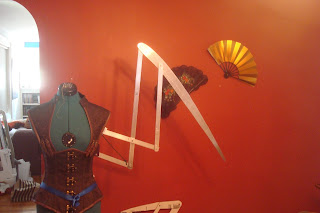
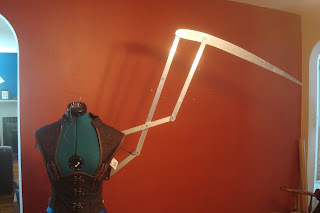
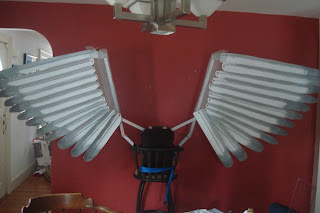
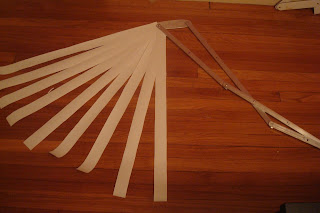
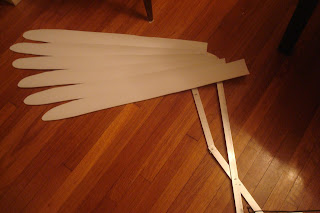
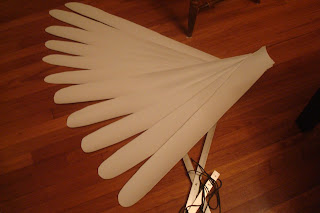
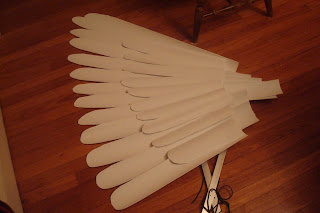
Because, you see, the belt in this costume does far more than act as a repository for your badge and hotel key. The utility belt is the primary resting place for your wing harness and thus supports almost all of the weight of the wings themselves.

But isn't the wing harness almost like a backpack? Why not just let it hang from your shoulders?

Even though the wings were designed to be as light as possible, carrying anything around for an extended period of time gets uncomfortable. The idea is to minimize that discomfort by having the weight of the wings be borne by as many different points as possible. Your waist and hips end up being ideal for this task, as they not only provide a fair amount of surface area, but are inherently designed to be load-bearing (after all, they carry your torso around pretty well). Your shoulders will end up helping out, but having them play proverbial second fiddle to your hips will do wonders for the stability of your harness and your overall comfort level while you're walking around in costume.

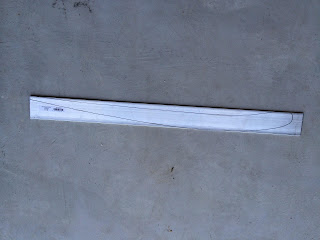
Since the belt had to do some not-quite-heavy lifting, it needed to be made from a very sturdy material. The easiest way to ensure that the belt can do its job is to start with a piece designed to do similar work. After a bit of research and a lot of combing through the virtual aisles of Amazon, I came upon this weightlifting belt that seemed as though it would be up to the task. Weightlifting belts are a good choice for this sort of sartorial role not only for their supportive capabilities, but because they usually come in both a variety of styles and very neutral colors. What they also tend to come with, however, is a bit of a glazed finish on at least one side of the belt. If the color or the glazed finish on the belt don't meet with your costuming needs, you'll need to chemically strip one or both of those things off of the leather. Fortunately, that process is fairly easy; all you need is a bottle of this, a well-ventilated area, some elbow grease, and time.

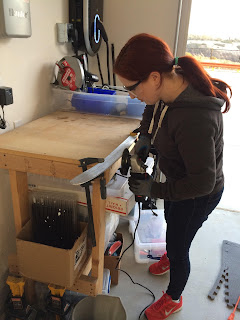
Once I'd gotten the belt to a raw, as-unfinished-as-possible state, I covered it with a mixture of acrylic paints to give it a deep reddish-copper color. If you're in the process of making this utility belt using these same methods, don't panic if it takes you 3-5 coats of paint to get the belt to the color you want. A layer of gold-brown fabric paint sealed in the acrylics and gave the belt a nice matte finish, as steampunk is generally all about mostly-muted surfaces.

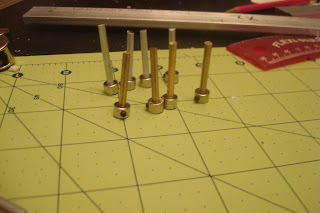
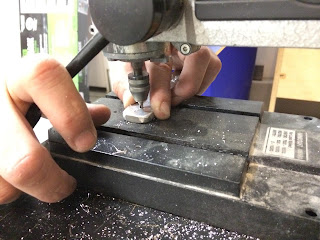
After the belt was the desired color, I added two of these weightlifting hooks onto the broad portion of leather that sat across the back of my hips by drilling through the belt and hanging the hooks with four of these rope clips (two clips per hook). I used a drill bit designed to punch holes in metal for this, but ended up having to carefully expand/finish the holes using one of the sanding bits on my Dremel. Determining where to hang the hooks was largely a bunch of trial and error, holding the wing harness up to my back while wearing the belt and adjusting until I was happy with the position. As a last step, I installed two slightly smaller versions of the rope clips into the front of the belt to hold the ends of the shoulder straps for the wing harness.

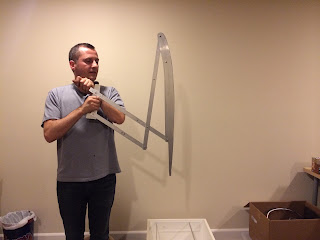
That gave me a solid utility belt that did pretty much everything I wanted it to (I'd wanted to add small pouches to give the belt, but ran out of time). The wing harness rested easily on the 'shelf' of the two weightlifting hooks and got additional support from the pair of shoulder straps attached to the rig and anchored with the rope clips on the front of the utility belt. Between those two sets of contact points, the rig was definitely secure and there were only one or two points during the day when I had the costume on where anything felt even a smidgen out of place.

The last bit of utility in the utility belt is as a fixation point for the paracord that opens and closes the wings. It only took a few minutes of walking around the halls of the Indianapolis Convention Center to realize that almost none of my fellow con-goers wanted pictures of the wings while they were in a closed position. To cater to this (and minimize wear-and-tear on the wings), I propped open the wings by extending them fully, then threading the draw cords down through the corset to wrap once around the belt itself, then anchor in the rope clips at the front.

Whew! So ends the series on Steampunk Hawkgirl. She was certainly a challenge, but I'll almost certainly be using or working to upgrade almost all of the components for a future convention. Now, on to Halloween!
Read More

Making Hawkgirl's Wings: Part 2

We're almost done with our series on the making of Steampunk Hawkgirl. If you're just tuning in now, we’ve talked about how the leggings, corsetwing harness, mace, the Worbla bits, and the supersized feathers came together, but let’s keep digging into the piece that makes this whole costume so challenging: the wings themselves.


After doing some initial research when I was in the thrall of a post-convention rush way back when, I decided that an extending arm configuration would be the best way to go for this particular costume (I definitely recommend reading about said investigations to see why I came to that conclusion and if the same setup will also work for your project). Initial tests with a cardboard mockup of the wings proved successful, so it then became a matter of how to translate the mockup into sturdier materials.

For all the details on how that initial translation was completed, check out this guest post by my cousin, Mel. She and her friend James were able to take the dimensions from my mockup and turn them into aluminum 'bones', which ended up being the rough draft/foundation for the finished wings.

While that rough draft was being completed, I was teaching myself to use the metal-shaping attachments on my model 4000 Dremel. Related aside: you will only need a handful of attachments for the Dremel and maybe a power drill for this portion of the project. Yes, really. Once I had the rough ‘bones’ in hand, I found that some additional cutting and sanding would be needed to get the overall shape and motion that I wanted. To do this, I used these cutting wheels for the Dremel and made several passes through the aluminum to get a nice, clean cut. If you're using these same methods to make your 'bones' it's definitely a good idea to get at least a five-pack of the wheels, as they will absorb heat and warp during your cuts.

Each wing consists of five ‘bones’: a larger pair that are perpendicular to one another and carry most of the stress (X and Y in the diagram below), a smaller pair that parallel and support the first pair (1 and 2 in the diagram below), and the gently curving ‘bone’ that ties all the others together and gives the wing its shape (Z in the diagram below). [bone dimensions] This diagram will give you the of each bone relative to the others.

Ok, so that’s how to make the bones, but how do they fit together?

In order to have the wings articulate, the bones need to be able to pivot or hinge relative to one another. Mel and James did an enormous amount of research about the best way to make this a reality. When the rough draft of the bones arrived, Mel and James had already drilled holes in the bones at certain points, which I needed to adjust these slightly by using a 1/8" (0.32 cm) bit in my power drill. Once those were all set, I inserted small rods of nickel, brass, and aluminum through the holes and secured them in place with these brass collars. To make these rods, I purchased one of each of these from various local hardware stores (you can also order similar items from Amazon). Because the bones are ½” (1.27 cm) thick, and the collars are 1/8” (0.32 cm) thick, the rods needed to be long enough to pass through two of each. (2*0.5)+(2*0.125)=1.125" (2.86 cm). Again using the cutting wheels for the Dremel, I sliced up each of the rods into pieces 1.125” in length. The articulation points are highlighted in gold in the diagram above.


There’s not a huge difference between using aluminum, brass, or nickel for the connection rods since the rods themselves are fairly small and don’t do much in terms of adding weight to your rig. It’s really a matter of what you prefer to work with and what’s available to you. The brass seemed to hold up best in this configuration, but your experiences may vary.

The same rod-and-collar technique is what holds the wings onto the ‘backpack’ that allows them to be worn. Using the drill attachments for the Dremel, I punched 1/8” inch holes at the top and bottom of each of the swinging plates that themselves are hinged to the backplate. I then threaded 1.375” (3.49 cm) rods through each of the holes: (2*0.5")+(2*0.125")+0.25” for the width of the wood. A brass collar on each end applied as snuggly as possible allows the wings to extend while remaining attached to the hinged plates. The snugness part can’t be overstated; you want as little wiggle room as possible at any of the articulation points not only for safety’s sake, but to minimize the amount of stress that you’re putting on those joints.

In terms of getting the wings to open and close, that involved pinpointing the best spot to put the drawstring. For an extending wing configuration, there are two points from whence you can draw: near the articulation point on the top horizontal bone or at an identical point on the bottom horizontal bone. I’m sure there are points on the vertical bones that you could draw from, but the way I planned on adding feathers to the bones would not have allowed for that. The idea of the drawstring is to pull the wings to an open position, then allow gravity to work its magic when you want them to close. To discern the best draw point, I tied paracord to one potential location on one wing, then did the same at the other potential point on the second. After threading the cord through both sets of pulleys in the rig, I tested to see which setup allowed for easier use and generally felt more secure. The draw point on the lower of the two horizontal bones won hands down. This wasn’t too surprising, as this point provides a shallower angle of ascent, which, in turn, puts less pressure on the pulleys and rope. The same may or may not be true of your wings, so it’s a good idea to test all possible draw points if you can.


We’ll go more into how to keep the wings open while you’re walking around or posing in a follow-up post wherein I’ll tell you how I made the utility belt for this costume.

The bones seemed to be ready to go after this point, so it was then a matter of getting the giant feathers onto them. The post about the giant feathers details how lengths of aluminum screening are what attaches each feather to the other. The screening also acted like a humongous sleeve that I could slip over the top join point of the bones (where Bone Y and Bone Z meet). Once the sleeves were in place on their respective wings, I clasped them in place by threading floral wire back and forth through the screening at a couple key junctures. The aluminum portion of the sleeves was concealed beneath another sleeve made out of painted foam that was edged with Worbla.

Connecting the feathers to Bone Z (so they fan out) involved drilling three holes along the length of the bone with a 1/16" (0.16 cm) bit in my power drill, then connecting metal and foam with some high tensile strength fishing line. The holes and Bone Z itself were covered up by two of the foam feathers: one on each side of the metal.  


This is by no means an easy or straightforward project, but it’s more achievable than it’s made out to be. A bit of planning, some experience with power tools, and a pinch of willingness to take risks will give you your own set of deployable wings! Best of luck on your costuming adventures!
Read More

Guest Post: Making Hawkgirl's Wings, Part 1

We are almost done with our series on the making of Steampunk Hawkgirl. Only a couple pieces of the costume remain in the proverbial un-posted-upon dark, but there's a good reason for the wait: I wanted you guys to have the most comprehensive explanation for how the 'bones' of the wings came together, as they were the most challenging part of this project. 

The 'bones' themselves were the result of two phases of construction, the first of which took place not in my little nerdy abode, but, rather, all the way out on the West Coast. My extremely talented cousin and fellow cosplayer, Mel, and her friend, James, generously lent their skills during the early parts of the build. Mel is joining us today to describe how she and James turned some strips of metal into the foundation for Hawkgirl's wings. So, without further ado, here's Mel! 


Hi Nerds! I’m Mel and am here to share my contribution to Kel’s amazing Hawkgirl cosplay with you.

I love cosplay. The pride of figuring out how to make something new and the joy of participating in my favorite fandoms is such a rewarding experience and just plain fun. For me, cosplay is at its best when it becomes a team effort. I am lucky to have fellow makers in my life that will go down the costume rabbit hole with me simply to figure out if we can pull it off. Every costume we do usually presents us with a new skill to master and we try to help each other achieve a level of craftsmanship we couldn’t approach on our own. It also keeps things fun when faced with the more frustrating and tedious tasks that costume making comes with. Enter Kel’s latest adventure: Steampunk Hawkgirl!

Kel called me up to debate her construction options and I jumped at the chance to pitch in. First, Steampunk Hawkgirl is just awesome, especially when part of a group Steampunk Justice League cosplay. Second, the particular conundrum of articulating wing construction is something I couldn’t resist. One of my cosplay partners in crime, James, has always loved the idea of making articulating wings, and I just wanted an excuse to run around the house pretending I could fly. Kel had done a ton of research, which you can read all about in her previous post, and was debating which material to use: PVC pipe, wood or aluminum. All three would work, but they each came with challenges. Ultimately, we agreed that aluminum was the best route as it would be lightweight, durable, easy to operate, and aesthetically complimented her desired wing shape. The problem was that Kel lacked workspace and the necessary tools to get these done. 

Having done some aluminum work with James on a pair of holster buckles for a Rule 63 Han Solo costume I'd put together for SDCC 2014, I decided to volunteer our assistance. James has completed a great deal of metal work out of his garage over the years so he could save Kel the cost of acquiring tools as well as the headaches associated with the trial and error of learning how to work with the material. As Kel and I live on opposite coasts, we agreed that she would send me her design details and James and I would make the structural components of the wings for her.

Kel’s design was great! She had not only researched and developed a working mechanism for the wings but she built a full-scale mock up out of cardboard to test operation, shape and size. I completely agree with Kel’s advice to do a small and full-scale test of complex cosplay elements out of cheap material that you can work with quickly. This is the stage where you can really refine the design and anticipate any major problems before you put your time and hard-earned cash into the real deal.

Kel passed along photos and the dimensions of her wings, which I used to draw a set of templates using Adobe Illustrator. James and I made our own cardboard mock-up so we could understand exactly what we were doing and what Kel needed.

James did some material tests and determined that we could slim down a number of components so save weight. If we were doing this out of wood the original size and shape of Kel’s design would have been perfect, but aluminum is much stronger so you don’t need the extra material. Since one of Kel’s goals was to keep the wings under 7 pounds, we trimmed wherever we could. After a thorough evaluation, we determined that we could slim down all but the largest piece (the large curved bone at the top of each wing), which gives the wing its awesome shape when extended.

We headed to our local hardware & metal store for materials. Here is what we picked up:

Aluminum Bars: 1” wide x ¼” thick x 96” long (2.54 x 0.64 x 243.84 cm)
Aluminum Strips: 3” wide x 1/8” thick x 6’ long (7.62 x 0.34 x 15.24 cm)
Du-BroDura-Collars: 1/8” plated brass #597
Jig Saw Blades for metal work

Back at the garage we pulled out the following tools:

Jig Saw
Angle Grinder
Clamps
Safety Glasses
Work Gloves
Drill
Pop Rivet Gun w/ Rivets
Scrap Aluminum Rod to fit the Dura-Collars

After tracing our template pieces onto the aluminum with a Sharpie, James began clamping the aluminum to a worktable and cutting the straight pieces with a jig saw fitted with blades specifically for cutting metal. (General reminder: make sure you wear eye protection! The last thing you want is a metal shard in your eye. There are lots of awesome characters with eye patches, but I don’t think you want to cosplay them everyday.) James cut slowly and steadily to avoid dulling the blade too quickly, but you do want to change the blade often. Metal work will chew right through sharp blades in a surprising amount of time. Buy lots of them and don’t be afraid to toss them frequently. Blades are relatively inexpensive and cutting with a dull blade can ruin your aluminum edges, putting you at greater risk for injury.


Next up, James cut the largest piece, which has a very distinct curved shape. For this he popped in a fresh blade and cut the piece out staying a little bit out from the marker line. This gave him some room to maneuver if he had a hard time going around a tighter curve or accidentally went off track a bit. Mistakes can happen when you are free-handing this stuff, so give yourself some room to course correct.


While James cut I began using the angle grinder on the rough-cut pieces. First, I rounded the corners of the straight bar pieces with the angle grinder and made sure there were no sharp edges. Doing this makes the pieces safer to handle and decreases the odds of the corners getting caught on any costume materials when the wings open and close. Second, I used the grinder to shave off that extra bit of aluminum that James left around the curved piece. This got the edge right to the marker line, ensuring an accurate shape. I then used some metal hand files to remove any lingering sharp edges.


After all of that, I marked where we needed to drill holes for fasteners and James took care of them with his mini drill press (a hand drill would work just fine as well but, hey, if you have a drill press use it!).


James did some thesis-level research on fasteners. Seriously, I think he could give a full dissertation on how to fasten two moving parts now. This is important because you don’t want to throw a typical screw and a nut on there just to find out that they will unscrew themselves every time you deploy your wings! This is exactly what would happen, by the way. The motion of those two rotating pieces will twist your fastener with it resulting in, surprise, disassembly on the convention floor! 

James originally thought he could use nylon-coated screws, as they are known for being a good solution for this type of application, but they, too, failed us. After much googling he determined that a combination of pop rivets and collars would do the trick. We identified which joints would stay fastened forever, which got pop riveted, and then cut a short piece of aluminum rod that is long enough to connect the two aluminum pieces with a collar on each side. Make a little divot on the rod where you want the collar screw to stop and you now have a temporary fastener that allows you to remove them later with an allen wrench. The reason for this is so the wings can completely collapse for storage.

Ta-da! Giant wings! Right on Kel's weight target too: each assembled wing weighs 3 lbs. 2 oz.

After deploying them a number of times… for science… they got packaged up and made the journey to Kel. Because I was probably just as excited for Kel’s cosplay as she was I made sure I could personally present the wings to her on a most appropriate day, Christmas.


And there you have it. Since Kel did the heavy lifting by figuring out how the wings would work we only needed two afternoons in the garage to make them. This project is a classic example of how cosplay is a whole lot of planning and then relatively quick execution, so do your research and go make something great!
Read More

Cosplay: All About That Mace

So Gen Con 2015 descended upon us all before I could finish publishing the last few posts covering the making of Steampunk Hawkgirl. This is something that will be rectified post-haste! To recap if you're just joining us now, so far we’ve covered the corset, the leggings, the wing harness, a few Worbla bits, and the supersized feathers that cover the wings. On today’s docket is the Thanagarian’s weapon of choice: the mace.  
I mentioned a while back that I can’t, for the life of me, draw in any appreciable or useful way, thus leaving me to take a costume from concept to physical reality in a single step. This made for a bit of a challenge when beginning work on a few components of Steampunk Hawkgirl, as there are no canonical reference images to provide guidance, and the mace, for whatever reason, proved difficult for me to put finite ideas to. Hawkgirl’s standard mace is pretty much your run-of-the mill smashy ball with spikes and a handle on it, but how do you go about making that look more steampunk?

After a lot of thought and a similar amount of research on the internets, I came up with the idea of having the ball part of the mace be a tesla coil/plasma sphere and replace the traditional spikes with arching tracts of gear teeth. While the concept was exciting, it would be a bit tricky to make real. There would be a handful of things that would need to be addressed in a hurry.
All tests went swimmingly

First on the list of Mace-Related Challenges was finding a tesla coil/plasma ball that was both sufficiently large and could be powered with batteries. There are lots of battery-powered plasma balls out there, but almost all of them have a diameter of 3” (7.62cm) or less, which is a bit too small in terms of proportionality to the rest of the costume. Conversely, there are also lots of larger plasma balls, but they are powered by AC only, making them less than feasible to walk around the convention halls with. Finally, I came across this guy which could be powered via a big pack of AA batteries. Win.

Once the plasma ball and battery pack had been procured it was a question of how they could be reasonably attached to some sort of handle, and it was pretty clear that a custom piece would be in order. To make the handle, I bought a 1/2" wide x 24" (1.27 x 60.96cm) long birch dowel  and a small bit of 12" x 4" (30.48 x 10.16cm) birch board, then cut both with the cutting attachment of my Dremel into lengths that would match up to the dimensions of the battery pack and base of the plasma ball. From the remaining birch board I cut a series of trapezoids similar to the sides of the plasma ball that would ‘pinch’ the ball in place and stabilize it so I could carry it around.

The wooden bits, the battery pack, and the plastic sides of the plasma ball all got three coats of gesso. Since all three components are made of different materials, the gesso ended up being an important step in making all the surfaces similar enough when it came time to add paint.

It’s here that I should note that the wood that was used here came from Michael’s and not a hardware store. Why does this matter? Usually wood that’s being sold for crafting purposes has been pre-treated to a degree, so you don’t have to spend time sanding and prepping the fiber before you do things like prime or paint. So just a heads up, if you get your materials from a hardware store you may have to build in a bit of extra time to finish this portion of the costume.All the primed surfaces got a few coats of a brown-copper acrylic paint to give the impression that everything was wrought from a weathered sort of metal. After this, I cut a gear-teeth-like pattern of semi-circles out of Worbla, then gave these the same treatment as the wood/plastic bits.

Once everything had dried it was time to start assembling. Using the Dremel, I cut a 1/4" (0.64cm) hole in the center of the piece of wood that would serve as the primary base for the battery pack and plasma ball. After a quick test run to ensure that the dowel that serves as the handle would fit snuggly into this hole, I marked the very first point where said dowel emerges from beneath the board, then drilled a hole 1/8" (0.32cm) in diameter straight through. A 2" (5.08cm) long zinc eyelet screw was then twisted through the hole so the eyelet itself faced up and flush against the board, lending the latter some support. This arrangement was fixed in place first with a heavy layer of gorilla glue, then with a thinner layer of rubber cement.

For the grip on the handle I took some dark brown leather leftover from my Aayla Secura ‘vest’ (related aside: how on Earth was that costume from three years ago?) and cut it into 1” (2.54cm) wide strips, then wrapped these around the bottom of the handle and fixing the leather in place with hot glue. At the top of the grip, I wound the leather over itself a few times to create the look of a handle. Pretty much any sturdy fabric will work for this and the birch/acrylic paint takes hot glue fairly well.


The last part of the assembly process is a bit tricky and, quite honestly, should probably be left until the last few days before you leave for your convention. The battery pack gets filled (if your plasma ball ends up being the same as mine, the pack requires 20 AA batteries), then attached to the base of the handle with gorilla glue. The plasma ball is then affixed to the battery pack with hot glue so you can pull the former off if you need to replace batteries or make adjustments. Originally I’d intended to use some of the trapezoid wooden cutouts to help stabilize the mace, but they ended up being unnecessary. After that it was just a matter of hot gluing the gear teeth to the base of the plasma ball.


Not gonna lie, the mace is neither light nor is it super stable, but it lights up and presents well. This was one of the more ambitious ideas I’ve had for a prop and I’m really hoping it works out well on the convention floor. We’ll find out soon!

Post-Con Update: Oh this poor mace. My misgivings about its structural integrity ended up being at least semi-founded. Even though the weapon came together as it was supposed to, it stubbornly refused to function after arriving in Indianapolis. I still can't discern exactly what went wrong, but I'm willing to guess that the process of transporting the components of the mace ended up jostling or otherwise internally damaging either the battery pack, the plasma ball, or both. More than a few hours of the night before Cosplay Saturday were spent frantically trying to get the plasma ball to work, but to no avail. Given that the ball was a no-go (and the weapon just didn't look right all darkened), I decided to scrap the mace entirely and walk the convention halls without it.

That being said, if the plasma ball had cooperated/survived the trip out to Indy, the build described in this post would have produced a pretty nifty result. It was disappointing to have to give up on the mace at the last minute, but I'll definitely try to complete the build (or something similar to it) for a future iteration of the costume. Hawkgirl will eventually have her mace!
Read More

Cosplay: the Thing With Feathers

We are under two weeks out from Gen Con 2015! Holy mother of the Avatar. Aside from the flurry of preparations, the last-days-before-a-convention nightmares have started in earnest. You know the ones; you arrive at the convention woefully unprepared or having forgotten/lost/broken some critical component of your cosplay kit. Those are just going to be a regular feature of my sleep cycle for the next couple of weeks. Fortunately, the construction process is well in hand, so we can chat a bit more about Steampunk Hawkgirl and how she came together. If you’re just joining us now and would like to catch up, you can read about the corset, the leggings, the worbla bits, and the wing fundamentals using those links (though, honestly, the order in which these are read doesn’t matter especially much).

Today we’re going to cover how to make the feathers, how to attach them to the ‘bones’ of the wings, and how to get them to fan out like those on a real bird’s wing. Fair warning, there is a LOT of repetition in the building of this part of the costume, so your best bet is to line up a good TV series, movie marathon, or excellent song playlist to keep you company.


As you can imagine, keeping the feathers as light and mobile as possible is the name of the cosplaying game. There are a couple of ways you can accomplish this: making the wings out of canvas or similarly sturdy fabric, out of paper or cardstock, or out of foam. After some initial experimenting, I chose craft foam, as it was both lightweight and could hold a shape nearly of its own volition. What you end up selecting will likely depend on what your wing ‘bones’ are made out of and where you plan to place your feathers. For example: wings that center on your actual arms can bear canvas feathers quite beautifully. If you do end up also choosing to use foam, I'd recommend getting at least three rolls of approximately this size to ensure you have enough for this project.

Once that decision had been made, it was a matter of actually making the feathers. To do this, I laid one of the wings out on the floor in its fully extended position. I then cut a roll of easel paper into 3” x 36” (7.62 x 91.44 cm) strips and arrayed the strips over the wing in a fan-like pattern, then trimmed them into varying lengths to mimic a real bird’s wing. This process was repeated with a second layer of feathers 2.5" x 24" (6.35 x 60.96 cm). Once I had a full “set” that covered all portions of the bones as I wanted them to, I copied the designs onto the craft foam twice so both wings would mirror one another. I ended up making a handful of wider feathers for the very bottom of the wings to create a more organic overall appearance, but it's entirely up to you if your project will have need of these.

The paper templates
First pass with the foam feathers


With the future wing covers in hand, thus began the long process of turning plain white foam strips into something that actually resembled feathers. After priming everything with gesso, I used ordinary hot glue to apply 1/8" (0.32 cm) dowels of balsa wood to each strip, then painted them with acrylics in the patterns I wanted. The dowels are necessary if your feathers are close to the dimensions I used in order to provide a bit of structure; omitting them will result in floppy feathers. As mentioned earlier, this process can be extremely time consuming, so a good bit of background noise will likely be very helpful.

Once all your feathers have been painted and buttressed you can begin mounting them to that they lay against the bones. The way I did this was to cut this aluminum screening into two strips 28” x 10” (71.12 x 25.4cm). The aluminum provides a sturdy surface on which to hang your feathers without adding too much weight to your rig. I bent the strips around the primary vertical bones of the wings, then held up each feather to where I wanted it to rest, marking the screen at this point with a sharpie. Using the punching tool from this kit, I cut 1/4” (0.64 cm) diameter holes into each feather and, with the help of a pair of tin snips, did the same at the sharpie-marked points on the screen. After that, it was a matter of aligning the holes in the screens and the holes in the ends of the feathers and joining everything together with some of these grommets. The grommets are also lightweight and allow the feathers a degree of movement if you’d like them to fan out or otherwise deploy. This whole process was repeated with the second, shorter layer of feathers.

Once all the foam had been attached to the screen there was the small matter of ensuring that the feathers would stay open and beautifully fanned out. To accomplish this, I joined each feather to the one above and below it with some carefully tied (and painted over) lengths of fishing line. This process is also extremely time-consuming, but definitely worthwhile as the finished effect is stunning. It also helps spread out the weight of the wings over the full surface of the 'bones' so you minimize the potential for stress-related snafus during wear.


Over top of the screens I molded a few strips of Worbla both to cover the former and to create a metallic, steampunky effect on the wings themselves. For the basics on how I worked with the Worbla, visit my earlier post on what thermoplastic can do for you. For pieces this long, however, it can be useful to work in small sections at a time (though it can be tricky to ensure that all sections are heated evenly as a result). Also, these steps were necessary for my particular project, as I needed the wings to be able to break down so I could ship them out to Indiana ahead of Gen Con. You can experiment as you see fit, especially if you’re ok with your wings having a more permanent configuration.

After the Worbla had been added, it was just a matter of priming it with gesso, painting it, and adding fun details to make it look like real metal. Just a heads up: Worbla is not at all a lightweight material even before you add things like primer and pain, so if you’re planning on adding any details to your wings it’s a good idea to keep them to a minimum.

We're almost to the end of this series! See you guys in the next installment!
Read More

Cosplay: All About Worbla

All the cosplay posts! Ok, not literally all of them, but I’m all about following through on my promise to you guys to spill the remaining details about how Steampunk Hawkgirl came/is coming together. If you’re just joining the conversation now or missed out on any of the previous installations pertaining to this costume you can read about the corset, leggings, and the support rig for the wings using those respective links. Today we’re going to go into all the little details of the costume that involved the use of thermoplastic. These included a breastplate, gauntlets, covers/toppers for my boots, the hawk crest necklace, and the helm portion of my mask/helm/goggles mashup.


We’ve talked about thermoplastics a couple of times, namely how to work with closed-cell plastic and now to shape lengths of acrylic into fun swords. What we’ll cover in this post pertains mainly to Worbla and other sheet-form, closed-cell opaque thermoplastics. Worbla is one of the single biggest buzzwords in cosplay right now, and it’s not hard to see why. With a bit of planning and a splash of heat, Worbla can take on just about any shape you can imagine. Want to re-create Zelda’s pauldrons or Kayle’s armor or Daenerys’ Qartheen belt? Worbla (or similar thermoplastics like Wonderflex) will help you make it happen.

That sounds awesome! How does it work?

First, you’ll need a few things, namely the Worbla itself, but also a heat gun, a Sharpie or other durable pen/marker, scissors, and craft foam. The easiest way to procure Worbla is online. Fair warning, it’s not the cheapest of costume-making materials, but if you buy in bulk you can save yourself a bit of cash in the long run. I always end up buying the largest sheets available both for the potential savings and the fact that the plastic has to come from Europe, which often translates into shipping times of at least a few weeks. Heat guns are a bit easier and cheaper to come by, as many models are available in most hardware stores (plus Amazon, which is where I got mine from). If you can, try to get a heat gun with a high and low setting, as this will give you the maximum amount of control when working with the thermoplastic.  All the other items are optional and dependent on the type of project you’re working on. I will make the following recommendation about cutting implements though: if you’re making something particularly complex or that just involves a lot of pieces you may want to splurge on a nice set of tin snips. Your hands will thank you if you spend any extended period cutting through the sometimes-uncooperative plastic. 

Once you have your materials it’s time to discern what shapes you’ll need for your project. For Steampunk Hawkgirl I used the clingwrap and masking tape method to draft patterns. All you need for that method are exactly those two items, a pair of scissors, and a marker. You wrap the part of your body you want to model or will otherwise be wearing your intended piece in plastic wrap, then do your best mummy impression and cover the wrap with a layer of masking or marking tape. Aside from becoming what will be your pattern, the tape offers two tactical benefits. First, you can draw directly on it with your marker to give yourself a concrete idea of shapes, designs, and potential decorations. Second, the tape will be a bit constricting, which will provide a great simulation of what it will feel like to have the thermoplastic on your body. Once you're happy with your designs, carefully cut the tape and plastic wrap off yourself, then trace the resulting shapes onto your thermoplastic and/or craft foam. Adding a layer of craft foam to your pieces helps give definition and structure to the finished product, but you should certainly experiment a bit to see if your particular project requires this step.

As the majority of endeavors involving Worbla or similar thermoplastics do require at least one buffering or structural layer of material, the rest of this post will focus on the techniques used to achieve that. If you're not layering your materials, the steps for warming up and shaping the Worbla are still the same and completely applicable. After you've cut out all your shapes and patterns (this should include anything you're using for decorative purposes as well as what your foundational pieces), it's a good idea to also cut out several long, thin strips of Worbla. These little strips can come in handy when finishing the edges of your pieces or for correcting areas that didn't turn out quite as planned. A safe bet would be to cut these strips to be twice as wide as the thickness of your thickest material.

Ok, so you have your shapes, your craft foam, and your edging material. Now it's time to prep your work space. I tend to like working on a piece of cardboard that I've covered with at least one layer of aluminum foil (with the dull side facing up, but this doesn’t make a huge difference). This helps protect the underlying surfaces, but also helps you recover the Worbla once it's been heated up since it can get pretty sticky. Handy things to have within easy reach include a sharpie/durable marker, a ruler, and a pair of scissors. Lastly, you’ll need your heat gun. I have a small square of granite that I keep under the heat gun just for another layer of protection, but having a dedicated resting place for your gun is completely optional.


***MOMENT OF SERIOUSNESS: HEAT GUNS CAN BE DANGEROUS; USE CAUTION WHEN HANDLING OR WORKING WITH THEM!***

Many heat guns have two settings: a lower heat and high heat. You’ll want to employ the highest setting your gun has when initially warming the Worbla. Also, this is an ideal time to orient your Worbla in order to make your crafting life easier in the near future. Worbla has two sides: a rougher side with a texture reminiscent of fabric and a smooth, shiny side. The latter will be more adhesive once the material is warm, so it’s almost always the side that you want to apply to the inside of your garment (or apply directly onto your craft foam, if you’re using it). I always have the Worbla lay with the rough side facing up at me from the aluminum foil because doing so allows the ‘glue’ of the shiny side to heat up gently, thus creating better behaved thermoplastic. This is just what I’ve found works for me though. You should definitely experiment to get an idea of what will serve you best.

Lay out your Worbla as you see fit and apply the heat from your gun as evenly as possible; using small circular motions tends to be very effective. You may notice that the Worbla will change to a subtly darker tan/brown color as it warms up; once your piece has completely taken on this hue, that’s usually the sign that it’s ok to begin shaping it. Carefully peel your piece off of your work surface. The Worbla should be very pliable, sticky, and hot, but not burning, to the touch. You have 15-30 or so seconds to mold the Worbla into your desired shape before it begins to cool and harden. To get your desired form, apply what was the shiny side directly to your foundation material (usually craft foam). Manipulate the Worbla with your fingers until you’re satisfied with the shape, then leave it to cool. If your first attempt at shaping didn’t go quite as planned, you can reheat the Worbla to make it flexible again. While you can repeat this a few times, try not to go overboard on the corrections, as it is possible to scorch the thermoplastic (it will turn white-ish and start to flake).

Once you’ve built up your desired piece from the Worbla, let it cool entirely. In the meantime, gather up any scrap thermoplastic you have leftover and set it aside in a safe place amongst your other crafting supplies. You never know when you may need an odd shape in a future project and, given the cost of Worbla, it can be handy to have extra bits on hand. After your piece has cooled and hardened, you can finish it as needed to achieve your desired look.

For the Worbla portions of Steampunk Hawkgirl, I primed each piece with four coats of gesso then painted directly onto the dried gesso with standard acrylic paints. This was to give the pieces a weathered, textured look in keeping with the Steampunk aesthetic. Sanding the gesso or using other agents in addition to the gesso, like wood glue, will give you a more polished and smooth finish if that’s what you’re after. For the trim, I used Rub N Buff in a few different shades (related aside: I highly recommend picking up the sampler set if you're going to invest in that specific finish). Rub N Buff is a wax-based paint that, while sometimes messy to apply, gives you an incredibly realistic metallic shine and works beautifully with thermoplastic.


If you're going to add straps or extra foam to help adhere your piece to the rest of your costume (or your body) I'd recommend using rubber cement on all surfaces that share an edge with the thermoplastic, as hot glue will likely cause distortions. Other than that though, you can add pretty much anything to the Worbla, including more Worbla.

It's an excellent material and lots of fun to experiment with. You'll get to see the 100% finished pieces in the very near future. In the meantime, best of luck with your costuming adventures!
Read More

Cosplay: This Rig Gives Me Wings

It has been far, far too long since there was an update on Steampunk Hawkgirl. We’ve talked a bit about some of the reasons why: the challenges of this past winter, personal illness, and a tidal wave of other awesome content for the site. However, she has not gone neglected these past few months and now we’re getting that exciting turning point where she’s beginning to come together (thank the Maker, since Gen Con is now less than two months away). So get ready for lots more cosplay to come your way.

Whenever I’m tackling a costume, I almost always start with what I feel will be the most difficult/complex component, as it’s often better to have a bit of extra time on hand in case something goes wrong or requires more materials. Also, everything else you build afterward seems that much easier and more feasible by comparison. For Hawkgirl, you might think this proverbial hillcrest would be the wings but, during my bouts of brainstorming, I kept centering on the harness that would carry those wings and allow them to deploy. The wings themselves will get at least one entry of their own (possibly two: one for the skeletons and one for the feathers).

All we need are some feathers!
As of the writing of this post, my suppositions about the challenges that the harness would pose have proven to be mostly on target. It took a bit of trial and error, but the harness or, as I’ve been calling it, the backpack, is about 95% done. All that remains are a few final decorations, and strategically adding some foam to make it a bit more comfy. Woo!

So what went into the harness/backpack and how long did it take to put together?

Actual construction took around three weeks, but you could easily make one of these in a day or two depending on the materials/tools you use and the weather conditions where you live. A lot of the three-week run time consisted of experimenting and doing lots of math (and making an absurd number of trips to the hardware store) to ensure that all components of the rig could handle the work they would have to do. Also, I ended up making two versions of the rig: one with a wooden base and another with a sintra base because it wasn’t clear which version would be both strong and sufficiently light to wear around all day. I’ll talk about the pros and cons of each version a little further on in this post.

Materials
-          2' x 4' x ½” (1.27 cm) birch board OR 11" x 17" (27.94cm-43.18cm) 13mm sintra PVC board
-          2 double sheave pulleys (I used these by Blue Hawk)
-          2 zinc-plated chain/rope clips
-          4 zinc-plated strap hinges*
-          About 2-3 feet of 1/8” (0.32cm) brass or aluminum piping/dowels
-          1-2 packages of 1/8” (0.32cm) brass collars
-          5-6 feet (1.52-1.83m) of very sturdy straps or webbing material
-          6-8 feet (1.83-2.44m) of paracord, strong rope, or galvanized steel cable (3/16” or 1/8” [0.48               or 0.32cm])
-          Whatever paint, stain or other decorations you’d like for the finished look
            *optional

I used a model 4000 Dremel and a 12V Ryobi power drill to do all the cutting, shaping, drilling, installation of screws, and finishing of edges. A bit of 200 grit sandpaper was involved in prepping the birch board for staining.

Some initial comments about the materials used and how I decided on these specific components: each piece of hardware was chosen because I’d calculated that it could perform the work associated with lifting at least one of the 4.5 pound (2.04kg) wings (3 pounds, 6 ounces [1.53kg] of which comes from the aluminum skeleton). That may not sound like a lot, but the way that the wings extend creates distortions in how that weight gets distributed. For example, that 4.5 pound wing requires only 4.5 pounds of force to fold the last few inches required to close them on the rig, but they require 22 pounds (9.98kg) of force to hold in a stable position once they’re open just because they’re so large, nearly 10 feet (3.05m) across when fully open. I overcompensated for this by selecting components that could bear at least twice that maximum force. The idea was that the motion of opening and closing the wings should ‘feel’ easy for the hardware. If your wings are made of a lighter material or don’t have as wide a total span then you can probably get away with hardware that isn’t as heavy duty.


First I drafted a pattern out of paper based on measurements of my torso. The idea was to have the rig eventually be at least partially integrated with the corset, so the shape of the former had to align with the latter. After some trial, error, and lots of comparing one shape up to another I re-drafted the pattern onto heavy cardboard. Once I was 100% satisfied with the dimensions, I cut the pattern into both the birch board and the sintra using the jigsaw cutting tool for the Dremel.


The next step is completely optional. When I’m designing a costume, I try to think of just about every use case and that includes all potential interactions that my fellow con-goers may have with what I’m wearing. My fear was (and still is, to a degree) that the sheer size of the wings is going to present a challenge when I’m walking around and that one or more people may bump or jostle them during the course of the day. The solution I devised for this was to mount the wings on hinged plates, so the plate (and wing) could swing backwards if they needed to. If you feel this function isn’t necessary for your costume, you can absolutely skip it and attach the wings directly to the backplate of the rig.

To make the hinged plates I did a bit of math to determine which shape would give the most support to the wings and reduce the amount of work required to lift the wings into an open position. Triangle-type structures are your friends if you’re planning on doing something similar! Once I devised the shape, I cut a pair of plates from each of my base materials with the Dremel, drilled holes for the wing support posts (also with the Dremel), and affixed each plate to the back of the rig with two strap hinges (one towards the top and another at the bottom). Strap hinges work especially well because they’re designed to support gates and other features that hold considerable weight far from the hinge point. Even after a whole mess of stress testing, both the plates and the hinges feel very solid.


Once the plates were secure, I did...you guessed it...more math to determine where the pulleys that will allow the wings to open and close should go. Initially I was going to use a single double sheave pulley in the top center of the rig and just cross the draw strings through it to articulate the wings. Some early tests quickly proved that doing so put way, way too much stress on that one poor pulley. Word to the wise: solid math is not a replacement for stress tests! It worked out so well on paper only to prove unfeasible in real life.

So it was on to Plan B, which involved one double sheave pulley on each shoulder, giving each wing two pulley sheaves worth of support when it articulates. While this does add a bit of weight to your rig, it does wonders for the shape and motion of the wing as the latter opens and closes. To hold the pulleys in place I used my power drill to create a pair of 3/16" (0.48cm) holes at each shoulder. Once the holes could accommodate the U rings of these chain/rope clips, I threaded the eye of one of the pulleys through that ring, then brought the clip flush with the rest of the back plate before installing the clip permanently with the matching hex nuts (these are almost always sold with the clip).


All that remains at this point is attaching the straps so the rig can be worn. For this, I used these tow cables. Just about any sturdy webbing will work for this purpose, but the tow cables were cheap and explicitly designed for dealing with high pressure and load bearing. After determining how I wanted the rig to lie on my back, I cut slots and fed the cables through, then anchored the cables with ¼” (0.64cm) bolts, nuts, and washers.

But wait…how do the wings attach to the backpack?

Excellent question. I’ll go into this again in the post that describes how the wings were made, but the mechanism that attaches the wings to the rig is the same as that which allows them to articulate. Each wing is supported by two posts that pass through both the metal of the wing and the wood/sintra of the swinging plates. Each post is 1 1/8” long, 1/8” (2.86 cm by 0.32cm) in diameter and is made of either solid brass or aluminum (the brass is stronger, but much heavier; you can feasibly use either without any problems). You can find metal dowels (including those in materials not listed here if you don’t want brass or aluminum) in a wide variety of diameters at Home Depot/Lowes/most other hardware stores. I cut the dowels into the lengths I needed, then sanded down the ends a bit with my Dremel. The posts are secured with these 1/8” brass collars, one on each end and tightened to the point where movement is just barely permissible. You want there to be as little wiggle room as possible between the bones of the wings and the plates of the rig, but we'll go more into how everything moves together in the post that describes the skeleton of the wings.


After that it was just a matter of sanding and staining the birch wood, then painting the sintra. With sintra, it is almost always a good idea to put down a layer of primer (I used gesso, but plain primer or even wood glue will work for this) since the surface of the thermoplastic tends to be pretty slick and resistant to paint. As for which of the rigs ended up being the better one, there's really no clear winner right now. Each material has its benefits and drawbacks, many of which will vary based on the demands of your wings.


Pros
Cons
Wood
  •   Cheap
  •   Strong
  •  Can be light
  •  Reliable
  •  Guaranteed to be compatible with your hardware

  • Can be heavy
  •  Requires much more work/specialized tools to shape
  •  Requires sanding and stain to change the color


Sintra
  •   Light
  •  Usually strong
  •  Can be heat-shaped for a          better fit
  • Is generally easier to cut/work with

  •  Expensive
  •  Less reliable in high-stress weight-bearing situations
  •  Requires a primer to change the color
There'll be a heap more testing, particularly once the wings themselves are 100% finished, and I'll make a decision on which rig to use based on the outcome of those. More on that in the near future!
Read More
Older Posts Home