


It has been far, far too long since there was an update on Steampunk Hawkgirl. We’ve talked a bit about some of the reasons why: the challenges of this past winter, personal illness, and a tidal wave of other awesome content for the site. However, she has not gone neglected these past few months and now we’re getting that exciting turning point where she’s beginning to come together (thank the Maker, since Gen Con is now less than two months away). So get ready for lots more cosplay to come your way.
Whenever I’m tackling a costume, I almost always start with what I feel will be the most difficult/complex component, as it’s often better to have a bit of extra time on hand in case something goes wrong or requires more materials. Also, everything else you build afterward seems that much easier and more feasible by comparison. For Hawkgirl, you might think this proverbial hillcrest would be the wings but, during my bouts of brainstorming, I kept centering on the harness that would carry those wings and allow them to deploy. The wings themselves will get at least one entry of their own (possibly two: one for the skeletons and one for the feathers).
 |
| All we need are some feathers! |
So what went into the harness/backpack and how long did it take to put together?
Actual construction took around three weeks, but you could easily make one of these in a day or two depending on the materials/tools you use and the weather conditions where you live. A lot of the three-week run time consisted of experimenting and doing lots of math (and making an absurd number of trips to the hardware store) to ensure that all components of the rig could handle the work they would have to do. Also, I ended up making two versions of the rig: one with a wooden base and another with a sintra base because it wasn’t clear which version would be both strong and sufficiently light to wear around all day. I’ll talk about the pros and cons of each version a little further on in this post.
Materials
- 2' x 4' x ½” (1.27 cm) birch board OR 11" x 17" (27.94cm-43.18cm) 13mm sintra PVC board
- 2 double sheave pulleys (I used these by Blue Hawk)
- 2 zinc-plated chain/rope clips
- 2 zinc-plated chain/rope clips
- 4 zinc-plated strap hinges*
- About 2-3 feet of 1/8” (0.32cm) brass or aluminum piping/dowels
- 1-2 packages of 1/8” (0.32cm) brass collars
- 5-6 feet (1.52-1.83m) of very sturdy straps or webbing material
- 6-8 feet (1.83-2.44m) of paracord, strong rope, or galvanized steel cable (3/16” or 1/8” [0.48 or 0.32cm])
- Whatever paint, stain or other decorations you’d like for the finished look
*optional
I used a model 4000 Dremel and a 12V Ryobi power drill to do all the cutting, shaping, drilling, installation of screws, and finishing of edges. A bit of 200 grit sandpaper was involved in prepping the birch board for staining.
Some initial comments about the materials used and how I decided on these specific components: each piece of hardware was chosen because I’d calculated that it could perform the work associated with lifting at least one of the 4.5 pound (2.04kg) wings (3 pounds, 6 ounces [1.53kg] of which comes from the aluminum skeleton). That may not sound like a lot, but the way that the wings extend creates distortions in how that weight gets distributed. For example, that 4.5 pound wing requires only 4.5 pounds of force to fold the last few inches required to close them on the rig, but they require 22 pounds (9.98kg) of force to hold in a stable position once they’re open just because they’re so large, nearly 10 feet (3.05m) across when fully open. I overcompensated for this by selecting components that could bear at least twice that maximum force. The idea was that the motion of opening and closing the wings should ‘feel’ easy for the hardware. If your wings are made of a lighter material or don’t have as wide a total span then you can probably get away with hardware that isn’t as heavy duty.

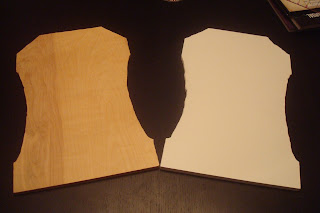
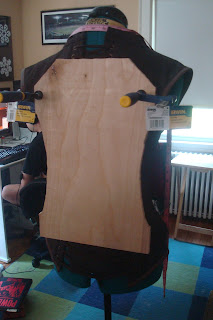
First I drafted a pattern out of paper based on measurements of my torso. The idea was to have the rig eventually be at least partially integrated with the corset, so the shape of the former had to align with the latter. After some trial, error, and lots of comparing one shape up to another I re-drafted the pattern onto heavy cardboard. Once I was 100% satisfied with the dimensions, I cut the pattern into both the birch board and the sintra using the jigsaw cutting tool for the Dremel.

The next step is completely optional. When I’m designing a costume, I try to think of just about every use case and that includes all potential interactions that my fellow con-goers may have with what I’m wearing. My fear was (and still is, to a degree) that the sheer size of the wings is going to present a challenge when I’m walking around and that one or more people may bump or jostle them during the course of the day. The solution I devised for this was to mount the wings on hinged plates, so the plate (and wing) could swing backwards if they needed to. If you feel this function isn’t necessary for your costume, you can absolutely skip it and attach the wings directly to the backplate of the rig.
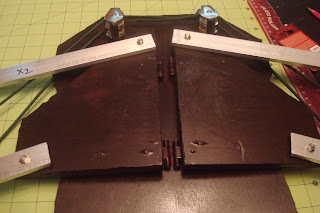
To make the hinged plates I did a bit of math to determine which shape would give the most support to the wings and reduce the amount of work required to lift the wings into an open position. Triangle-type structures are your friends if you’re planning on doing something similar! Once I devised the shape, I cut a pair of plates from each of my base materials with the Dremel, drilled holes for the wing support posts (also with the Dremel), and affixed each plate to the back of the rig with two strap hinges (one towards the top and another at the bottom). Strap hinges work especially well because they’re designed to support gates and other features that hold considerable weight far from the hinge point. Even after a whole mess of stress testing, both the plates and the hinges feel very solid.

Once the plates were secure, I did...you guessed it...more math to determine where the pulleys that will allow the wings to open and close should go. Initially I was going to use a single double sheave pulley in the top center of the rig and just cross the draw strings through it to articulate the wings. Some early tests quickly proved that doing so put way, way too much stress on that one poor pulley. Word to the wise: solid math is not a replacement for stress tests! It worked out so well on paper only to prove unfeasible in real life.
So it was on to Plan B, which involved one double sheave pulley on each shoulder, giving each wing two pulley sheaves worth of support when it articulates. While this does add a bit of weight to your rig, it does wonders for the shape and motion of the wing as the latter opens and closes. To hold the pulleys in place I used my power drill to create a pair of 3/16" (0.48cm) holes at each shoulder. Once the holes could accommodate the U rings of these chain/rope clips, I threaded the eye of one of the pulleys through that ring, then brought the clip flush with the rest of the back plate before installing the clip permanently with the matching hex nuts (these are almost always sold with the clip).

All that remains at this point is attaching the straps so the rig can be worn. For this, I used these tow cables. Just about any sturdy webbing will work for this purpose, but the tow cables were cheap and explicitly designed for dealing with high pressure and load bearing. After determining how I wanted the rig to lie on my back, I cut slots and fed the cables through, then anchored the cables with ¼” (0.64cm) bolts, nuts, and washers.
But wait…how do the wings attach to the backpack?
Excellent question. I’ll go into this again in the post that describes how the wings were made, but the mechanism that attaches the wings to the rig is the same as that which allows them to articulate. Each wing is supported by two posts that pass through both the metal of the wing and the wood/sintra of the swinging plates. Each post is 1 1/8” long, 1/8” (2.86 cm by 0.32cm) in diameter and is made of either solid brass or aluminum (the brass is stronger, but much heavier; you can feasibly use either without any problems). You can find metal dowels (including those in materials not listed here if you don’t want brass or aluminum) in a wide variety of diameters at Home Depot/Lowes/most other hardware stores. I cut the dowels into the lengths I needed, then sanded down the ends a bit with my Dremel. The posts are secured with these 1/8” brass collars, one on each end and tightened to the point where movement is just barely permissible. You want there to be as little wiggle room as possible between the bones of the wings and the plates of the rig, but we'll go more into how everything moves together in the post that describes the skeleton of the wings.
After that it was just a matter of sanding and staining the birch wood, then painting the sintra. With sintra, it is almost always a good idea to put down a layer of primer (I used gesso, but plain primer or even wood glue will work for this) since the surface of the thermoplastic tends to be pretty slick and resistant to paint. As for which of the rigs ended up being the better one, there's really no clear winner right now. Each material has its benefits and drawbacks, many of which will vary based on the demands of your wings.
|
|
Pros
|
Cons
|
|
Wood
|
|
|
|
Sintra
|
|
|
There'll be a heap more testing, particularly once the wings themselves are 100% finished, and I'll make a decision on which rig to use based on the outcome of those. More on that in the near future!
No comments :
Post a Comment