NomNoms! How to Make Strawberry Pie


Ok, so while the 'Care' portion of the blog is kind of amorphous and a bit of a catch-all, the 'Feeding' is pretty straightforward and the idea is to keep the content a happy blend of both. So, to attend to the latter (but not lesser!) half of the blog I present to you the first featured recipe!

This is a simple but deeply satisfying sweet treat that takes the best parts of a strawberry and introduces them oh-so-smoothly to that rakish lad across the tavern known as Comfort Food. With few ingredients and maximum flavor payout, it definitely qualifies as 'high yielding noms'. While the recipe is ostensibly for use with a mini-piemaker, I've included two easy variations that produce equal deliciousness without the gadgetry.

Difficulty: Noob
Availability of Ingredients: Common
Gadgetry: Optional
Feeds: 4-6 nerds
Time Till Noms: About 20 minutes if using the mini-pie maker, about 30-60 if using other means of baking.

Required Equipment: A medium-sized bowl, a sharp knife, a mixing spoon, a rolling pin (or something that can be used to flatten dough), a cutting board and ONE of the following baking implements: a mini-pie maker, a muffin tin, OR a pie plate.
Optional Equipment: (makes life easier, but you can clear this level without them) A pastry brush, a fruit zester, a dough stamper, a hand-juicer, a pie press, a pie lifter.

Ingredients
1 pound(454 grams) of fresh strawberries
1 lemon
3 Tablespoons of granulated sugar
2 teaspoons of flour
1 box (2 scrolls) of pre-made pie dough
a pinch of salt
1/2 teaspoon of cinnamon
1/4 teaspoon of nutmeg
1/4 teaspoon of powdered ginger
*non-stick cooking spray if attempting this using the muffin tin method

Prelude: If you're using this recipe to make a full-sized pie or mini-pies with a muffin tin, preheat your oven to 425 degrees Fahrenheit (218.33 degrees Celsius). If you're employing the muffin tin to get your mini-pie fix spray the cups with a light coating of the non-stick spray.


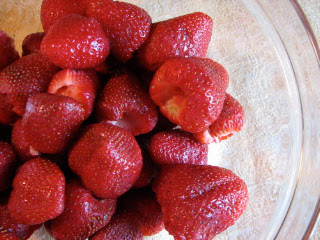
Step 1: Rinse the strawberries in cold water, then pat, shake, or centrifuge them dry (so much fun if you have a salad spinner). Twist off any and all green leafy tops, then arrange the berries on a cutting board and chop them up into quarter inch/1cm long pieces (oh the humanity!).

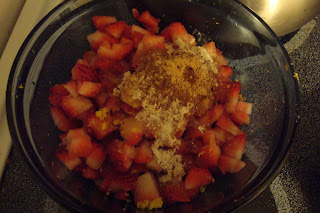
 Step 2: Deposit the chopped berry bits into a bowl. Add the flour, sugar, salt, and other spices to the bowl as well. Now we're ready for the lemon.
**Bonus Enhancement: Before cutting the lemon, roll it firmly across your countertop/cutting board a few times with the palm of your hand  (as if you were rolling out dough using the lemon). Why? The pressure of the rolling will rupture the cell walls that comprise the lemon peel and also help break up the membranous internal barriers that divide the fleshy part of the lemon into wedges. This will help release aromatic essential oils inherent to the peel  AND get those lemony juices flowing on the inside. The result: more pungent zest and an easier time coaxing juice out of the lemon.**

Step 3:With either a sharp knife or a fruit zester, scrape the peel off of about half of the lemon's surface area and into the bowl with the other ingredients. Cut the lemon in half. Extract the juice directly into the bowl from the newly naked half either with a hand-juicer  or Hulk-style by clenching the lemon in your fist (cut side facing your palm to avoid getting seeds in the pie filling). Mix the ingredients together until all the berries are evenly coated with flour/sugar/spicy goodness.

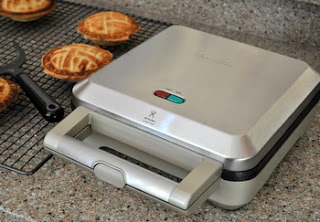
If you are using a mini-pie maker, plug it in now and let it go through one full pre-heating cycle ('ready' light will come on, then go off again) while doing the next steps.

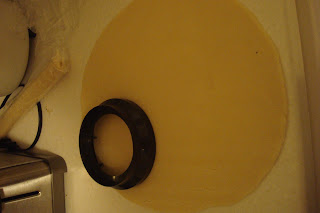
Step 4:Unfurl a scroll of pre-made pie dough on your countertop. Gently press, stretch, or roll the dough until it's as flat and even as possible, as it will unroll with a few creases straight out of the package. If you're attempting a full-size pie, use the dough to line the bottom of your pie plate. If you're using the pie-maker or a muffin tin, cut the dough into circles about 5 inches (12.7cm) in diameter. If you're using a muffin tin, test one of these 'rounds' in your tin to ensure a good fit and adjust succeeding rounds as needed.

Step 5:Cut four of these 5-inch rounds (or as many as needed for the muffin tin). Then set aside any leftover dough scraps, unfurl the second scroll of dough, and press flat just like the first scroll.

Choose your own adventure!   Are you: Using a pie-maker? (Go to paragraph π) Using a muffin tin? (Go to paragraph ϖ) Making a full-sized pie? (go to paragraph τ)

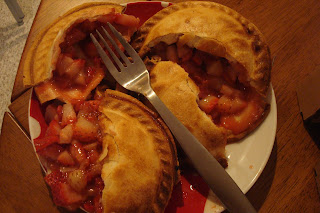
Paragraph π: From the second scroll of dough you cut four circles of 4 inches (10.2cm) in diameter. You place both the 5-inch and 4-inch 'rounds' of dough into the freezer until the pie-maker is entirely pre-heated. Once the pie-maker is hot and ready, you remove the dough rounds from the freezer and carefully place the larger 5-inch rounds into the appropriate places on the pie-maker griddle (you use a pie press if you have one). You spoon the filling, dividing it evenly amongst the four future pies. Once the dough has been partitioned, you place the 4-inch rounds on top of the filling, then close the pie-maker. You wait with mounting impatience for 10 minutes while the pie-maker does its transmutation thing, then you open the device to reveal golden pastry nirvana. You try not to inflict second-degree burns on yourself by sampling prematurely as the pie cools.

Paragraph ϖ: From the second scroll of dough you cut one circles of 4 inches (10.2cm) in diameter. You quickly test the round against the circumference of one of the cups of your muffin tin. Success! They are an approximate match (you adroitly adjust if they do not). You cut as many 4-inch rounds as are needed to complement your cache of 5-inch rounds. You line the cups of your muffin tin with the 5-inch rounds then giddily spoon the luscious berry filling inside. You cap each filled muffin cup with a 4-inch round and gently press around the circumference to seal the flavor inside. (You may brush milk or a beaten egg yolk across the tops for a more dramatic golden finish). You place the muffin tin inside your preheated oven, then ponder the true nature of human existence for 10 minutes as heavenly scents waft throughout your kitchen. You check your muffin-pies after realizing that hunger is a more pressing concern than the musings of the existential self. Brilliance! You are rewarded with flaky fruit-filled delights. (You return the pies to the oven if they are shy and unready to be welcomed into the world...and your stomach).

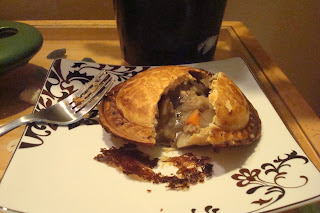
Paragraph τ: You spoon the filling into the pie plate already lined with dough. You pull the second scroll of dough over the top of the filling, then gently crimp the edges of the two scrolls together with thumb and forefinger before trimming away any excess dough. (You may brush the top of the pie with milk or a beaten egg yolk for a more dramatic golden finish). You punch 2-4 small holes in the top layer of the dough, deciding that the approximate center of the pie is the best place for these. You place the pie in your preheated oven for 30 minutes before removing it, reducing the heat of said oven to 350 degrees, then baking for an additional 15-20 minutes. After such time you are famished and eagerly throw open your oven door. Level cleared! You gain 1 scrumptious confection.

And there was much rejoicing...and pie...and rejoicing.
Quick FAQs

Do you have to use pre-made dough? Can I get all fancy and try to use my own from scratch?
Definitely. In fact, I will eventually post my recipe for homemade dough on here. However, the pre-made stuff is MUCH easier to work with, particularly if you're using the mini-pie maker. Very much your call though.

When do you mean when you say a pinch of salt? That's not terribly precise.
No, it's not. Though I'm a scientist at heart and love me some precision measurement, some aspects of cooking involve a certain amount of eyeballing. In the case of this recipe it's exactly as it sounds: however much salt escapes from between your thumb and forefinger when you rub them together once. I would not recommend skipping the salt though, as it subtly enhances all the other flavors of the pie.

Do I have to make closed-top pies?
No. You can do these pies with no tops or with snazzy latticework if you wanted to. The recipe above was intended to present the easiest option that involved no experimentation in terms of ingredients or cooking time. Feel free to play around with it though. It's super versatile.

Can you do this recipe with other berries? Like blueberries?
That, fine inquisitor, will be another recipe for another day. I have a collection of pie recipes on hand and will be sharing quite a few of them on here but blueberry pie will be the subject of a future post.

What about frozen strawberries? Are they OK to use?
Yes, but I'd recommend partially thawing them first. Strawberries are comprised primarily of water and their texture is going to change as they thaw and expand. Let frozen berries stand in a bowl at room temperature for about 20 minutes before working with them as the recipe calls. Using completely frozen berries can make a watery, soupy mess of the filling and result in some seriously soggy pie. So be careful if you decide to go this route.

Happy Nomming!
Read More

Cosplay: I'm a Grown Woman Who Plays Dress Up

It might just be a sign of my terminal nerdiness that writing a post foments enough relaxation and joy that I can consider it a "break" from paper-writing. Somehow it's finals time already and I am close to a few months of freedom from the Damocles-esque threat of homework and exams. That being said, this post represents a couple of starting points for what will be future series within the blog. There's going to be quite a few posts on cosplay, of which this is one, but there will hopefully also be an equal number of posts on the attitudes, thoughts, and paradigms that are shaping the experience of what it is to be a nerd at present. So, without further ado…

I sometimes like to think of myself as a born-again cosplayer because, really, weren't we all cosplayers at some point in our respective pasts? At some point during our existence to date we affixed a bath towel cape to our collars, made helmets of oversized hats, scrounged for bits of makeshift armor from our parents' kitchen cabinets, or brandished cardboard tube lightsabers and vorpal swords. Some cosplayers will cringe visibly upon reading that comparison, as it alludes to one of the most common inquiries we receive upon revealing our avocation:

Aren't you a little old to be playing dress-up?

It's a question that, even if asked innocently, is typically met with defensiveness, angst, dismissal, or even repudiation. Motivations for this tend to be derived from either personal pride (how DARE you belittle my costumes!), insecurity (they're making fun of me!) or both. While perfectly understandable, these reactions usually aren't truly about the various aggressive or passive-aggressive facets of the question, but rather our own beliefs concerning our hobby. The degrees of offense lie in the belief that we are doing something else, something 'higher' or more sophisticated, than what we'd engaged in as children. We're not; we are playing dress-up.

There is absolutely nothing wrong with that.

That's not to say that the efforts extended in both incarnations of the activity are remotely comparable. Designing and building a set of deployable crystal wings that capture the essence of an ice elemental is not in the same hemisphere as tying an old Christmas tree skirt around your waist and pretending to be Princess Peach (though both are awesome). 
I wish I could have had these wings as a kid.
Making the comparison based on skill or available resources is foolhardy. The effort put forth by either the adult cosplayer or the child at play is meant to achieve exactly the same goal: to pretend to be someone other than your everyday self.

Using costumes and props to enhance one's self-image or to take on the mantle of an entirely novel persona is an activity that is old as human civilization and something that persists into modernity if the billion-dollar wedding gown industry is any indication. To that effect, most such modern full-on costuming either takes place within the context of a ritual or as part and parcel of some larger spectacle (say a play or parade). One could argue that a convention, arguably one of the most common venues for modern cosplay, consists of a bit of both (from the cosplayers perspective). Rife with anticipation, surrounded by your nerdy peers, a convention (a good one anyway) already lies somewhat apart from the mundane, made distinct primarily by the individuals who attend it.

Wait wait wait. Doesn't waxing poetic about cons kinda detract from the earlier statement that you're a grown woman just playing dress-up?

Not at all. This is just setting the scene; explaining why conventions and renaissance fairs create a uniquely  welcoming environment that would inspire certain nerds to go that extra step and make their imaginative passions not only a reality, but a reality on a semi-public stage in full view of their highly knowledgeable peers.
Or the REALLY public view
For many of us it's the ultimate labor of love, a living testament to a favorite series or character. Perhaps it's the challenge of making something truly fantastical a part of our world, even for just a little while. In all likelihood it's a little of each of those and more.  For me personally it's equal parts structural challenge, innate insatiable craftiness, and gushing fangirl. The last point is multi-faceted and circular in a way that I couldn't conceive of until I actually walked the con floor in character. The first time a fellow con-goer approached me with a look of joyous recognition, thrilled to see his favorite character in the flesh, provided me with a new perspective on this then-nascent hobby of mine. I wasn't just playing dress-up for me; I was just a part of the larger imaginative collective at the con. That act of playing dress-up helped my fellow con-goers and I the opportunity to recede into our creative, dorky minds and leave reality behind for just a little while. A game of make-believe on a steroidal scale.

It is my contention that it is this ability to suspend the constraints of the mundane, our refusal to "grow up" even if we are numerical and legal adults, that is one of our defining features as nerds.  It is our charge to keep our imaginations alive, to maintain a little bit of wonder and awe.

So I'm a grown woman who plays dress up. However, given the matters of scale that differentiate my imaginings of old with those of today, perhaps 'born again cosplayer'  can be replaced.

 Though fitting, I think instead I'll refer to my early playing as the work of a cosplay Padawan. (cosplay Jedi to follow in August!)
Read More

Codex Entry: Kitchen Electric -> The Personal Pie Maker


We're going to dive right in to the eponymous "Feeding" portion of the blog with a review of possibly the greatest kitchen-related investment I've ever made: the mini-pie maker. Hyperbole? No, and I'll tell you why.

Nerds often get tossed handily under the LAZY bus when the subject of food preparation comes into play. Though this is assuredly true on some levels (overdramatized for humorous effect here) this is also at least partially unfair. The appeal of high yielding food, epic deliciousness from very little effort, resounds with pretty much everyone.  Time is a precious precious resource and there are probably an infinite number of things we'd rather do than cook, but we don't have to resign ourselves to fingertips coated with orange artificial cheese. (Cue the "How DARE you besmirch Cheetos/Doritos woman!")

Behold, the mini-pie maker. 
This device can transform a variety of ingredients into a set of up to four personal-sized (4 inches in diameter) pies in a mere 8-10 minutes. I cannot underscore this enough. PIE. Pie that you do not have to share with anyone in pretty much any flavor you can dream up. Piping hot, flaky crusted pastry goodness that fits neatly into a single hand in less time than it takes to set up a game of Arkham Horror (ok ok, plus expansions and character selection).

To backtrack a bit, it then comes as no surprise when I confess where my loyalties lie in the eternal debate as to which confection reigns supreme, pie or cake, (note: this is not actually a debate whatsoever) but even my ardent affection faltered somewhat upon seeing the retail price for this beauty. While the siren song of personal pies beckoned relentlessly, I remained deeply skeptical of the device, not wishing to fork over $100+ for a kitchen gadget that could very well end up barely used and consigned to basement storage (see: our espresso set, fondue set and waffle iron). One conveniently timed sale and a whole heap of research later, I relented and the pie-marker was sitting on our counter. It has been a beloved feature of our kitchen ever since.

So how did the pie-maker come to this lauded position and avoid the Valley of Unloved Kitchen Electrics? Three primary reasons: versatility, facility of use and ease of cleaning. Though we typically associate pie with dessert, the pie-marker allows for myriad possibilities from both the sweet and savory realms. Alongside traditional favorites like blueberry and peach we've crafted Cornish pasties, fajita pockets, lamb curry psuedo-samosas, and bacon-laden breakfast quiches. 
The vast majority of these are incredibly easy to prepare and I'll be sharing some recipes in future posts. I've also heard, but have not attempted it myself, that the pie-maker can be used to bake personal cupcakes and muffins. 
 
You say 'easy', but how easy is it really? 

The degree of facility depends entirely on how you want to tackle a particular recipe. If the notion of following any recipe makes you bristle, you can still achieve fairly awesome results with canned pre-made filling. Open can, cut dough, pour filling, close pie-maker, wait, consume. That's it. Some of the best pies we've made to date were filled with leftover bits from other meals. (Note: some filings will need to be cooked before they are incorporated into a pie) That being said, some recipes are more labor-intensive and may be better attempted once you've practiced and leveled up your pie-making skills.

Cleaning is stunningly, mercifully simple. Simply wait until the pie-maker has cooled so as not to be a burn threat, but is still warm to the touch, and wipe down with a damp paper towel. Deeper cleanings should be interspersed at regular intervals (say every third or fourth batch or if you're swapping from savory to sweet pies) but 'deeper' here implies only that you swab the inside with a soft soapy sponge then rinse by wiping the area with another damp paper towel. That's really all you ever need to do aside from perhaps buffing out the occasional fingerprint.

You mentioned dough back there. What kind of dough are we talking about?
The dough that gets most frequently tossed into the pie-maker is your run-of-the-mill pre-made store-bought pie dough. You grab a box from your grocer's refrigerated foods section (the dough is typically nestled near the butter or cheese).  A box will usually contain 2 'scrolls' of dough, which is more than enough to make the tops and bottoms of four personal pies. Gently unroll the scroll and cut out the required rounds. We have also used tortillas, ready-made croissants from a can, and phyllo dough.

Wait wait wait. You said 'cut the dough'. How will I know how much to cut? What do I cut it with?
Not to worry. Most personal pie-makers on the market today come with little stamp-type cutters that are precisely measured to provide you with dough circles that exactly match the dimensions of your pie-maker. All you have to do is apply the stamp to the dough and remove any excess.

So why this model pie-maker? There are a whole bunch to choose from. Is this brand better than the others?
My pre-purchase readings led me to conclude that the vast majority of personal pie makers available for sale right now have pretty much identical functionality. The primary sources of price differentials are the number of accessories included (more on that in a moment), warranties, the composition of the external housing, type of internal coating, and, of course, brand name. Stainless steel is going to set you back more than plastic and legitimate non-stick coating is going to be more expensive than a 'non-stick surface'. Your intentions for the device ostensibly come into play as well. Longevity was an important deciding factor for me and I'd had excellent previous experiences with the Breville brand.

What accessories will I need to make some kick-ass pies?
As mentioned, most personal pie-makers come with the dough cutter stamp but you should also look for makers that include a dough press. The press is another type of stamp that shapes the cut rounds into the actual cooking surface. While you don't necessarily need the press (the weight of the filling will likely push the uncooked dough into place) it definitely makes the cooking process a little easier. Also to put under the not-crucial-but-nice-to-have file is a lifter. The pie lifter is a specialized spatula that does exactly what its name implies: hoists hot pies out of the pie-maker. Why bother with a fancy 'lifter'? To preserve the non-stick surface of your pie-maker. Could you use a couple forks to do the same thing? Sure, just take care not to scratch the actual cooktop of the pie-maker or it will quickly transform from easy-to-clean helpful kitchen droid to heinous high-maintenance electro-bitch (to be banished to the Valley of Unloved Kitchen Electrics soon after). Last thing to possibly look for: a recipe book. Some pie-markers include a smattering of recipes in the instruction manual, but most recipe books are super cheap ( <$10) and can help get the old creative epicurean juices going.

I'm kinda nervous but sort of excited about this.
Totally understandable. It's an investment and a new way of preparing food (potentially very new if you've yet to dip a toe into the proverbial World of Baking pool) but, I promise, it's very much worthwhile. A couple clicks and a trip to the grocery store and you'll be set to have pie to your heart's content.

Best of luck on all your pie-making adventures!
Read More

Prologue: Gettin' Started


The idea of cobbling together a blog has appealed to me for a while but, for a whole host of reasons, I've brushed the notion aside...well, until now. I've managed to gather a melange of topics orbiting a single overarching theme that might be helpful , even entertaining, and more than, say, a digital diary (as has been the fate of all previous attempts at blogging).

So here it is: the Care and Feeding of Nerds.  

Ok, what's this all about? Well, the idea is that the site will be comprised of posts that cover a variety of topics about different facets of nerd life. Ostensibly, food is going to factor in quite a bit and you'll see reviews and tutorials of various kitchen gadgets in addition to recipes for all sorts of nomnoms. The "Care" portion of the title is far more broad and will range from summaries of crafty projects (specifically those related to my cosplay addiction) to nanofiction to synopses of individual games.

Last, but perhaps most important,  will be entries that speak to concepts and trends that define and affect daily life for nerds. We're in the midst of a Nerdaissance at the moment both due to demographic shifts in the nerd population and the fact that media outlets have recognized these shifts and responded in kind. The success or failure of the latter is likely to have a pronounced impact on the former and vice versa due to the miracles of teh interwebs. The intent is not to be another nerd news site, but to provide a space in which to dissect topics that are affecting, or will affect, us all.

That's the long and short of it. Some crafty goodness, some spirited discussion, and a whole lotta yummy food. I hope you enjoy!  
Read More
Newer Posts Home